¶ Table of Contents
- Pairing Receiver Pair
TrackerswithReceiver - Gyroscope Calibration Calibrate
gyroscopeto reduce drift - Accelerometer Calibration Calibrate
accelerationto reduce drift
¶ Pairing Receiver
Products are pre-paired with the receiver by default.
During pairing, you can refer to the LED status: Mini Series User Guide.
If the
TrackerandReceiverfirmware versions are inconsistent, pairing will fail. Refer to: Firmware Update Guide.
If you encounter this situation, you can try re-pairing: some trackers may fail to pair or multiple trackers are recognized as the same tracker (symptom: shaking different trackers, but only one tracker moves in the software).
- Open SlimeVR software on your computer (optional, can be used to observe pairing status).
- Insert the receiver into the computer's USB port and wait for at least
3 secondsbefore proceeding. - Insert all trackers into the charging dock, check each tracker connection:
Clickthe charging dock button, all indicator lights should illuminate. - Press and hold the receiver button for more than
6 seconds(but not exceeding10 seconds), then release. The receiver will now clear all paired trackers.
If you hold the button for more than
10 seconds, it will enter DFU (firmware upgrade) mode (redandbluelights will be constantly lit). Please unplug and reinsert the receiver to start pairing again.
-
Triple-clickthe receiver button within2 seconds. The receiver will enter pairing mode, withblue lightflashing1 timeevery1 second. -
Triple-clickthe charging dock button within2 seconds. Now all trackers'blue lightswill flash1 timeevery1 second.
Please keep all receivers and trackers within 1 meter of each other during operation.
- Observe all trackers. Successfully paired trackers will
blue lightflash quickly4 times, thenblue lightflashes1 timeevery10 seconds. - All trackers should pair within
20 seconds. If any tracker takes longer than20 seconds, try removing the corresponding tracker, press the button on the tracker to restart, wait3 seconds, then re-triple-clickto enter pairing mode.
If all trackers show no response after
20 seconds, check whether the receiver has entered pairing mode. Try unplugging and reinserting the receiver, then repeat steps1-7.
- When all trackers show "pairing successful", double-click the receiver button to exit pairing mode.
If pairing mode is not exited properly, SlimeVR software will not recognize the trackers.
- Then press the button on the charging dock (or each tracker) to restart the trackers.
After restarting, if you have started SlimeVR software, the trackers should be recognized by SlimeVR within
20 seconds. If not recognized, please check: Is the receiver connected to the computer correctly? Were pairing steps executed correctly? Try restarting SlimeVR software and reinserting the receiver. Or try re-plugging the dock (if you have one). Alternatively, try restarting your computer.
¶ Gyroscope Calibration
Calibration is not needed every time. It is only recommended when "first use" or "natural drift speed is much higher than expected".
You should select the calibration tutorial matching your product series and model to operate, otherwise it may cause worse effects or even damage your device.
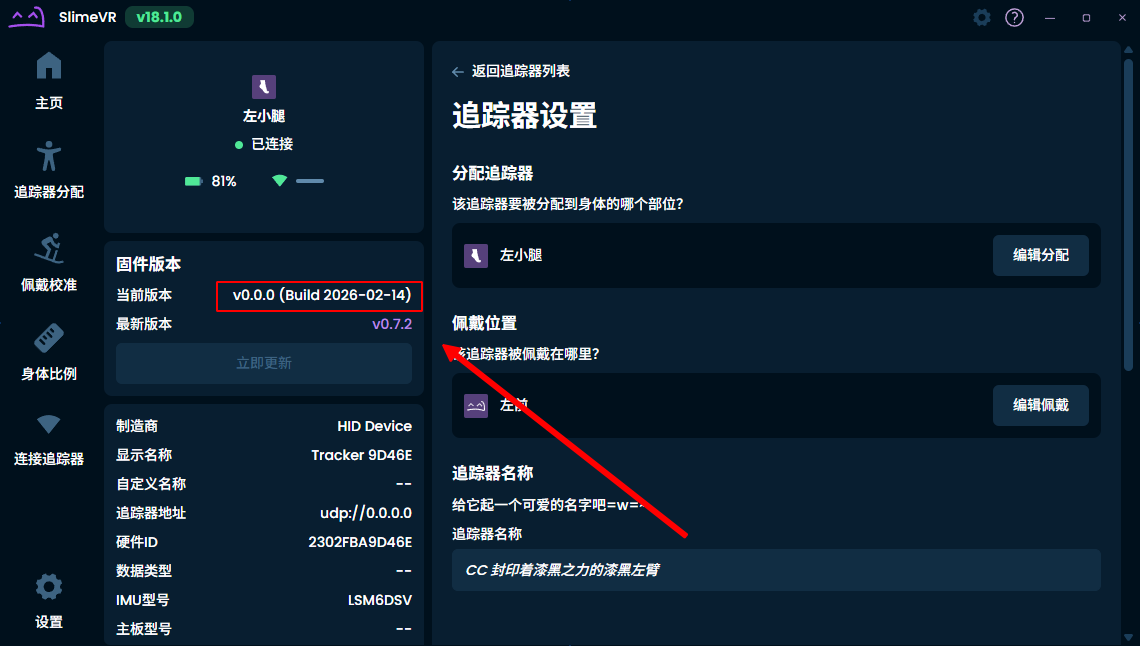
¶ Check Version
You can check the tracker version here to select the correct calibration method.
¶ Calibrate Device
You can choose either Basic Calibration Guide or Advanced Calibration Guide, but we still recommend using the Advanced Calibration Guide as much as possible, so that
trackerscan maintain good working status in different seasons and temperatures.
If the ambient temperature changes significantly and after
continuous wear for 30 minutes, you still feel that drift time is noticeably higher than usual, try recalibrating.
If you need to switch from
Advanced Calibrationback toBasic Calibration, or for equipment purchased before April 15, 2026:
Please first refer to the beginning ofAdvanced Calibration Guideto clear calibration data, otherwiseAdvanced Calibrationwill overwriteBasic Calibration, making calibration invalid.
- Please wear continuously for
30 minutesor more before calibrating, at which point the device operating temperature is stable and optimal calibration results can be obtained.
Wearing the VR headset is not required, just wear the tracker and keep it powered on. Normal activity is allowed during this period.
- Insert all trackers into the charging dock as quickly as possible (or calibrate individual trackers one by one via the tracker side button).
If not inserting into the charging dock, you can also calibrate individual trackers via the function button on each tracker.
To avoid tracker temperature changes affecting calibration results, do not exceed 1 minute from removing the tracker to completing calibration.
- Check each tracker connection:
Clickthe charging dock (or tracker) button, all trackers' (or current tracker's) indicator lights should illuminate. - Place the charging dock containing trackers (or the trackers themselves) on a stable hard surface (do not place on desk or wooden floor). After placement is stable, quickly
double-clickthe charging dock (or tracker) button. - The trackers will now flash, then stay lit briefly (about
6-10 seconds). Do not touch or move the trackers during calibration. After indicator light flashes quickly4 times, calibration is complete.
¶ Update Firmware
Not applicable to old firmware versions. Please update firmware before calibration.
Firmware version requirement: not lower than v1.9.0_260513
¶ Prepare Equipment
RefrigeratorHair dryer
¶ Download Tool
- Download the latest
StyriaMiniTooltool from the firmware update page for advanced calibration operations.
¶ Perform Calibration
- Find a stable hard surface (do not place on desk, try to avoid wooden floor) as the
calibration area, and ensure it can be reached by thehair dryer. This area should be as close to the computer as possible (to observe data) for subsequent calibration.
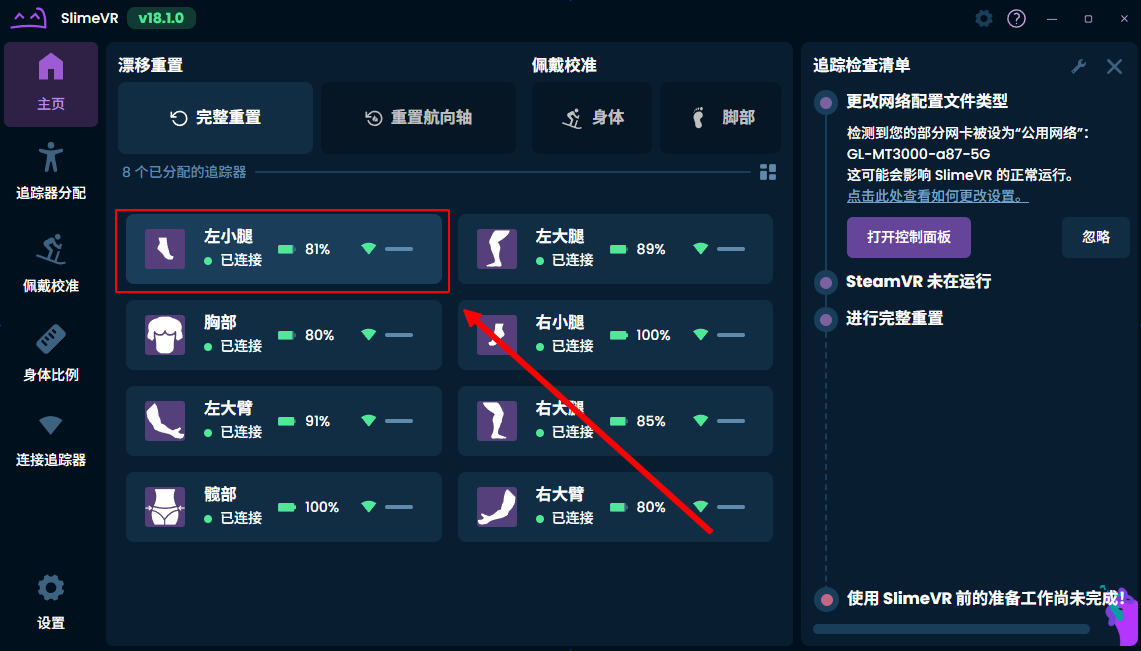
You need to verify that when shaking the tracker at about
10cmabove thecalibration area, SlimeVR can normally recognize alltrackermovements.
If thetrackeris too far from thereceiveror severely occluded, calibration command reception may be affected, so it should be as close as possible.
-
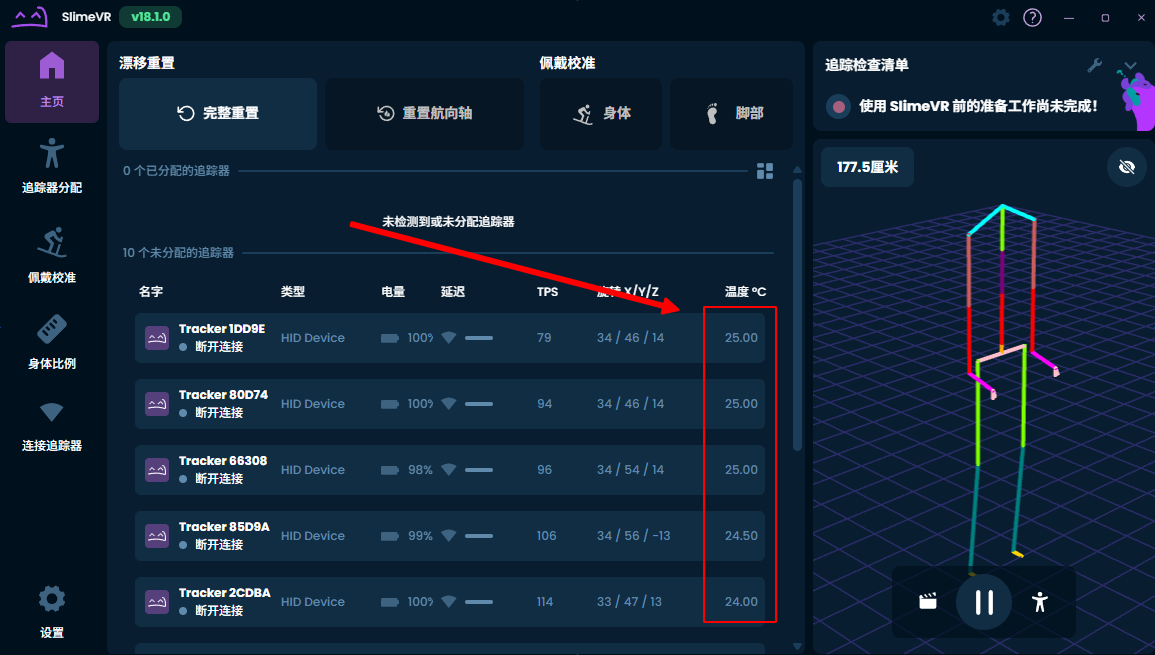
Modify SlimeVR settings to observe each tracker's temperature:
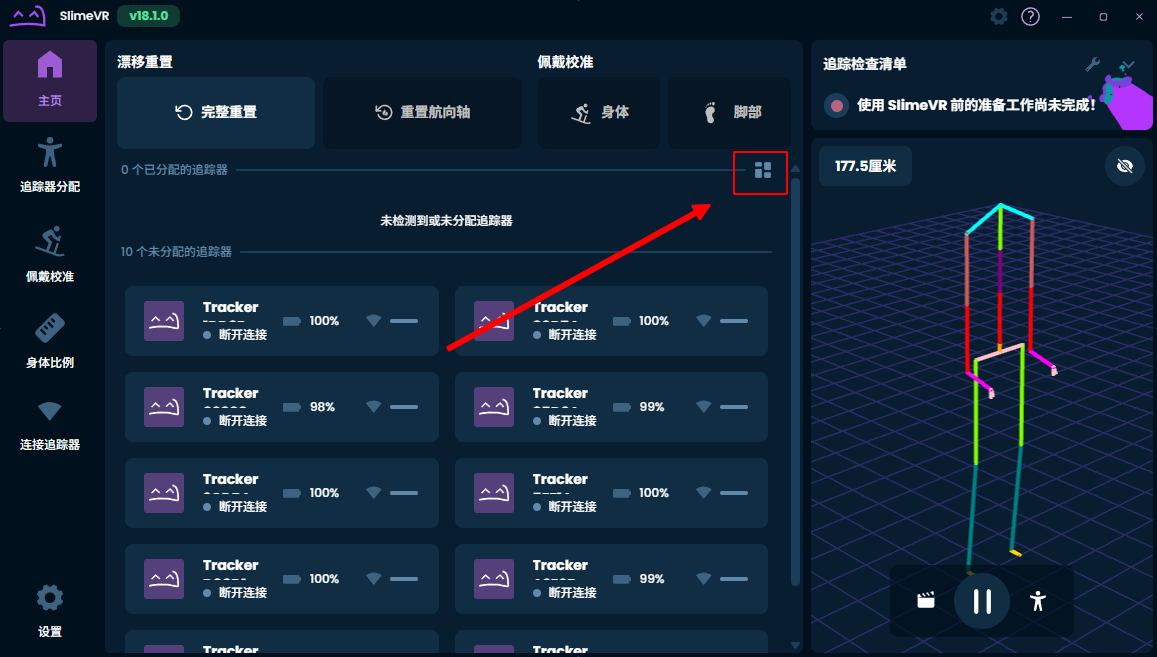

-
Insert the
receiverinto the computer, open SlimeVR application.- Place
trackersinto thecharging dock. - Press the button on the
charging dockto ensure alltrackersare started. - Shake the
trackersto ensure SlimeVR can normally recognize alltrackermovements before calibration.
- Place
-
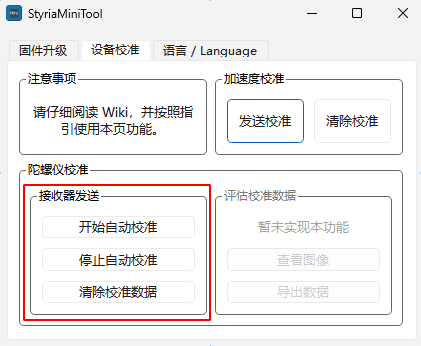
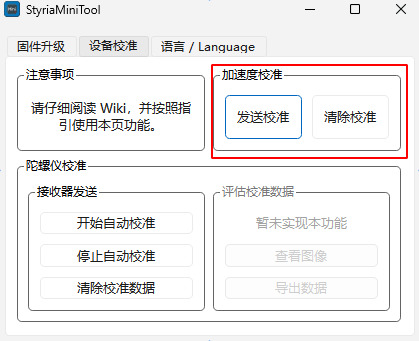
Open the
StyriaMiniTooltool, switch to theDevice Calibrationpage, clickGyroscope Calibration - Clear Calibration Data, and clickYesto confirm.
- If you need to continue with
Advanced Calibration, proceed.- If you just want to clear
Advanced Calibrationdata, stop at this step. Subsequent calibration only needs to follow the Basic Calibration Guide. (Advanced Calibrationwill overwriteBasic Calibration).
- Place the
charging dockcontainingtrackersinto therefrigerator(use plastic wrap or similar to isolate from food in the refrigerator) for pre-cooling. Temperature and time requirements are as follows:
If your room temperature is already below
15°Cand thetrackershave been placed for some time, you can skip this step.
4°C ~ 15°Crefrigerator environmentoroutdoor in winter: store for30 ~ 45 minutes
Do not store your device at temperatures below
3°C, as this may affect calibration results (difficult to recover) or damage your device.
- Remove the
trackersfrom the refrigerator (steps6-8need to be completed within1 minute). - Check each tracker connection: press the button on the
charging dock(ortracker) to ensure alltrackers' (or currenttracker's) indicator lights illuminate. Shake thetrackersto ensure SlimeVR can normally recognizetrackermovements before calibration. - With the bottom surface of each
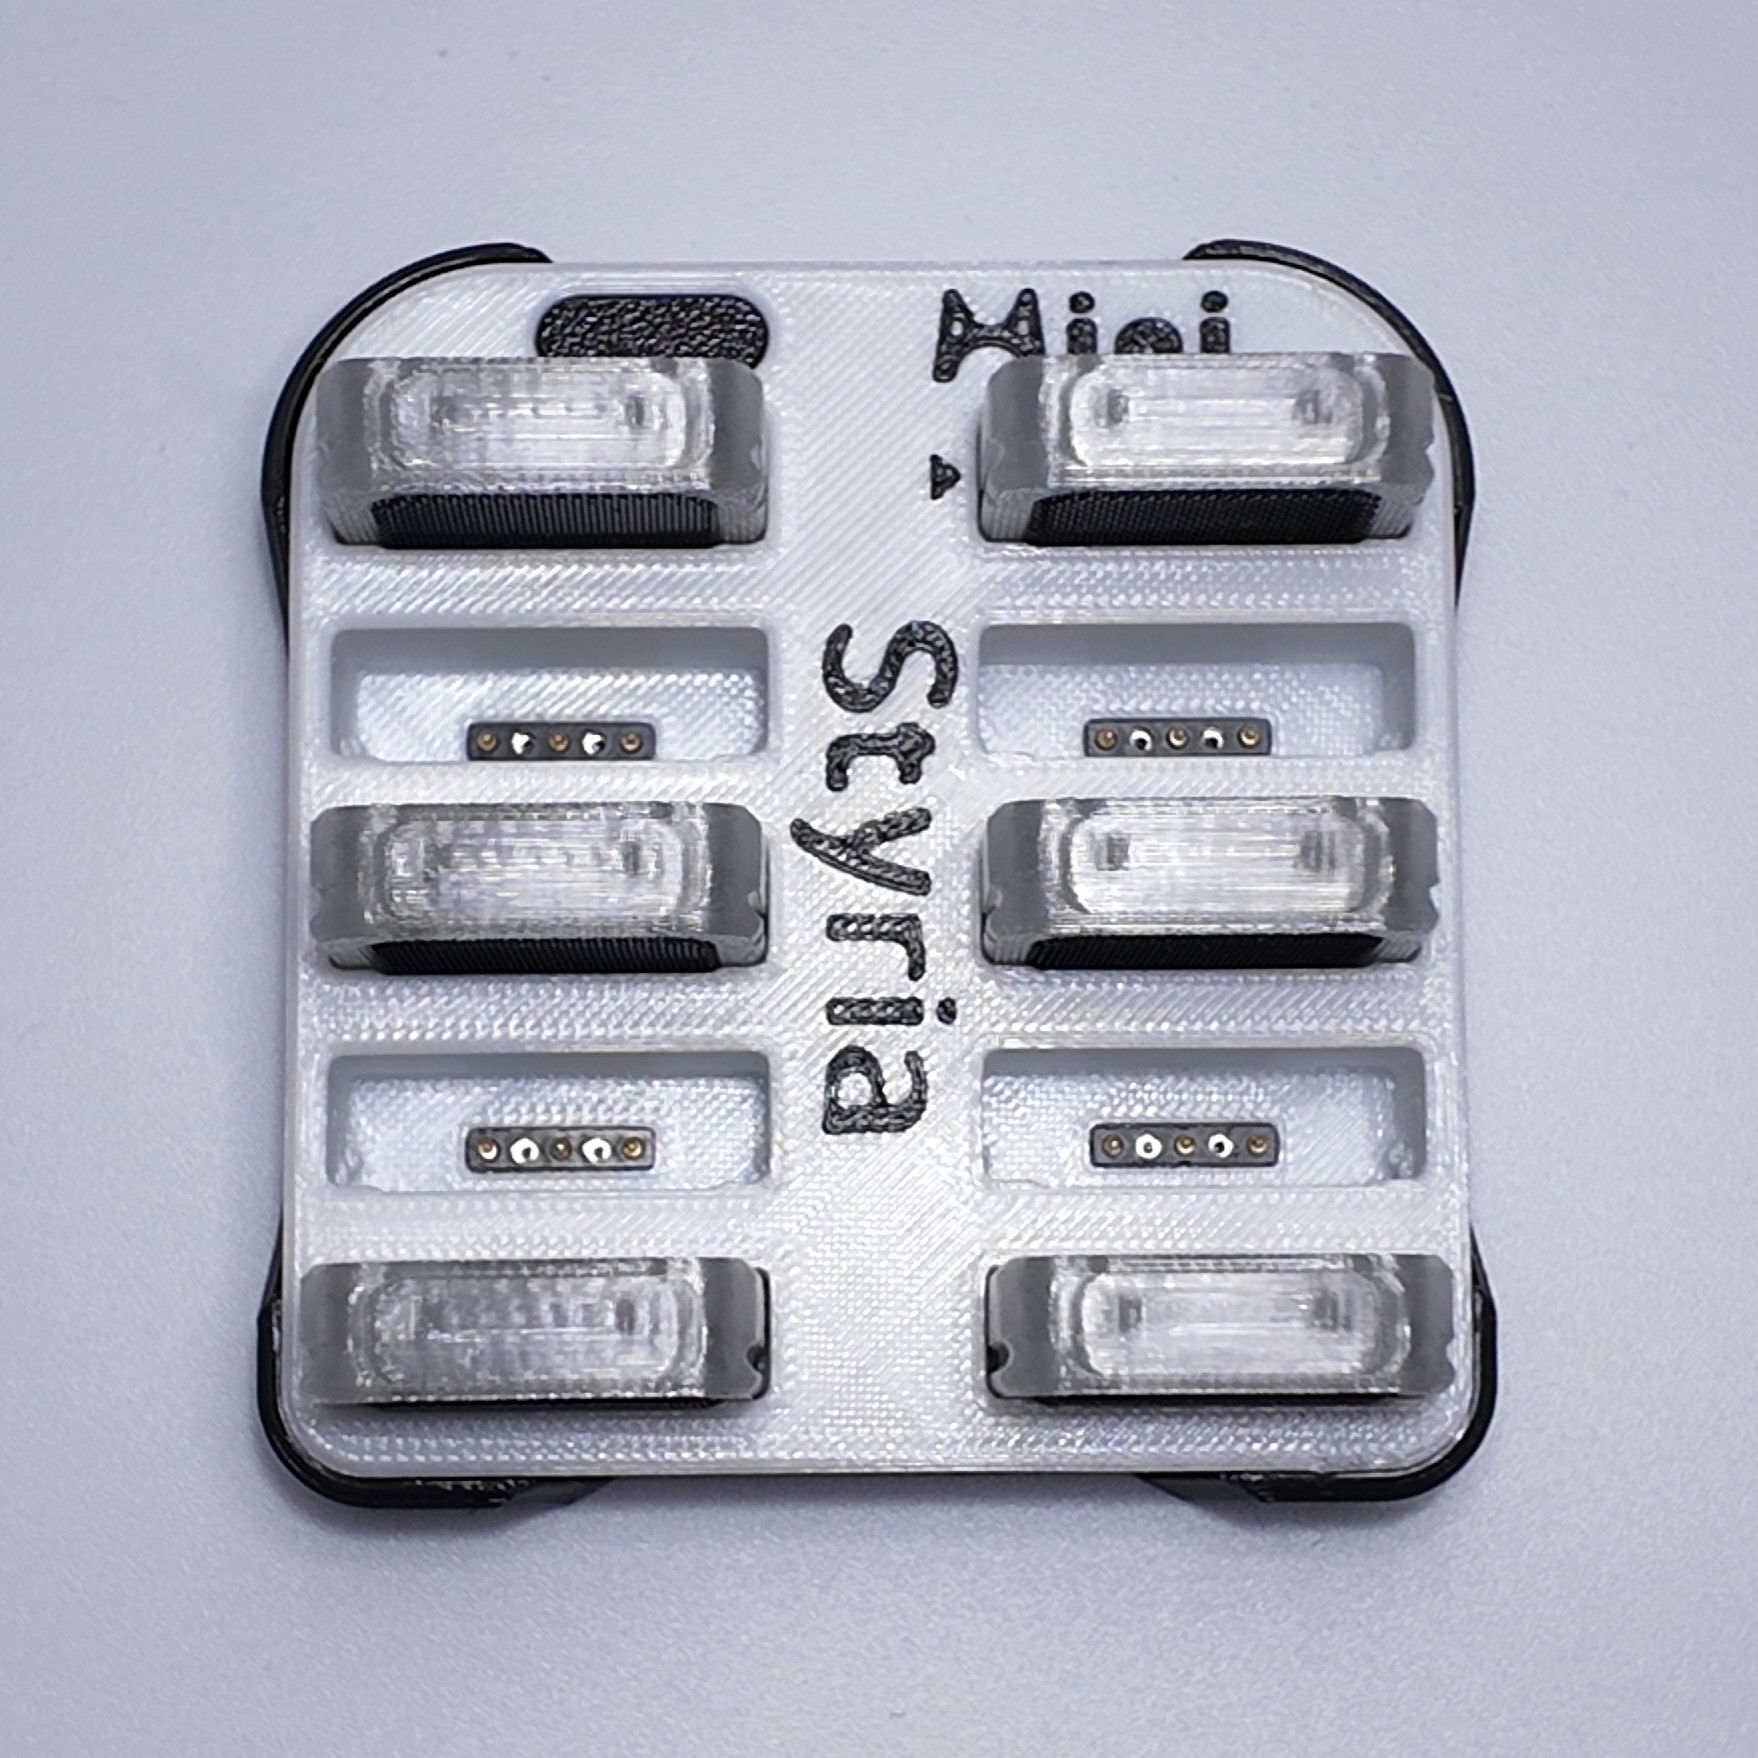
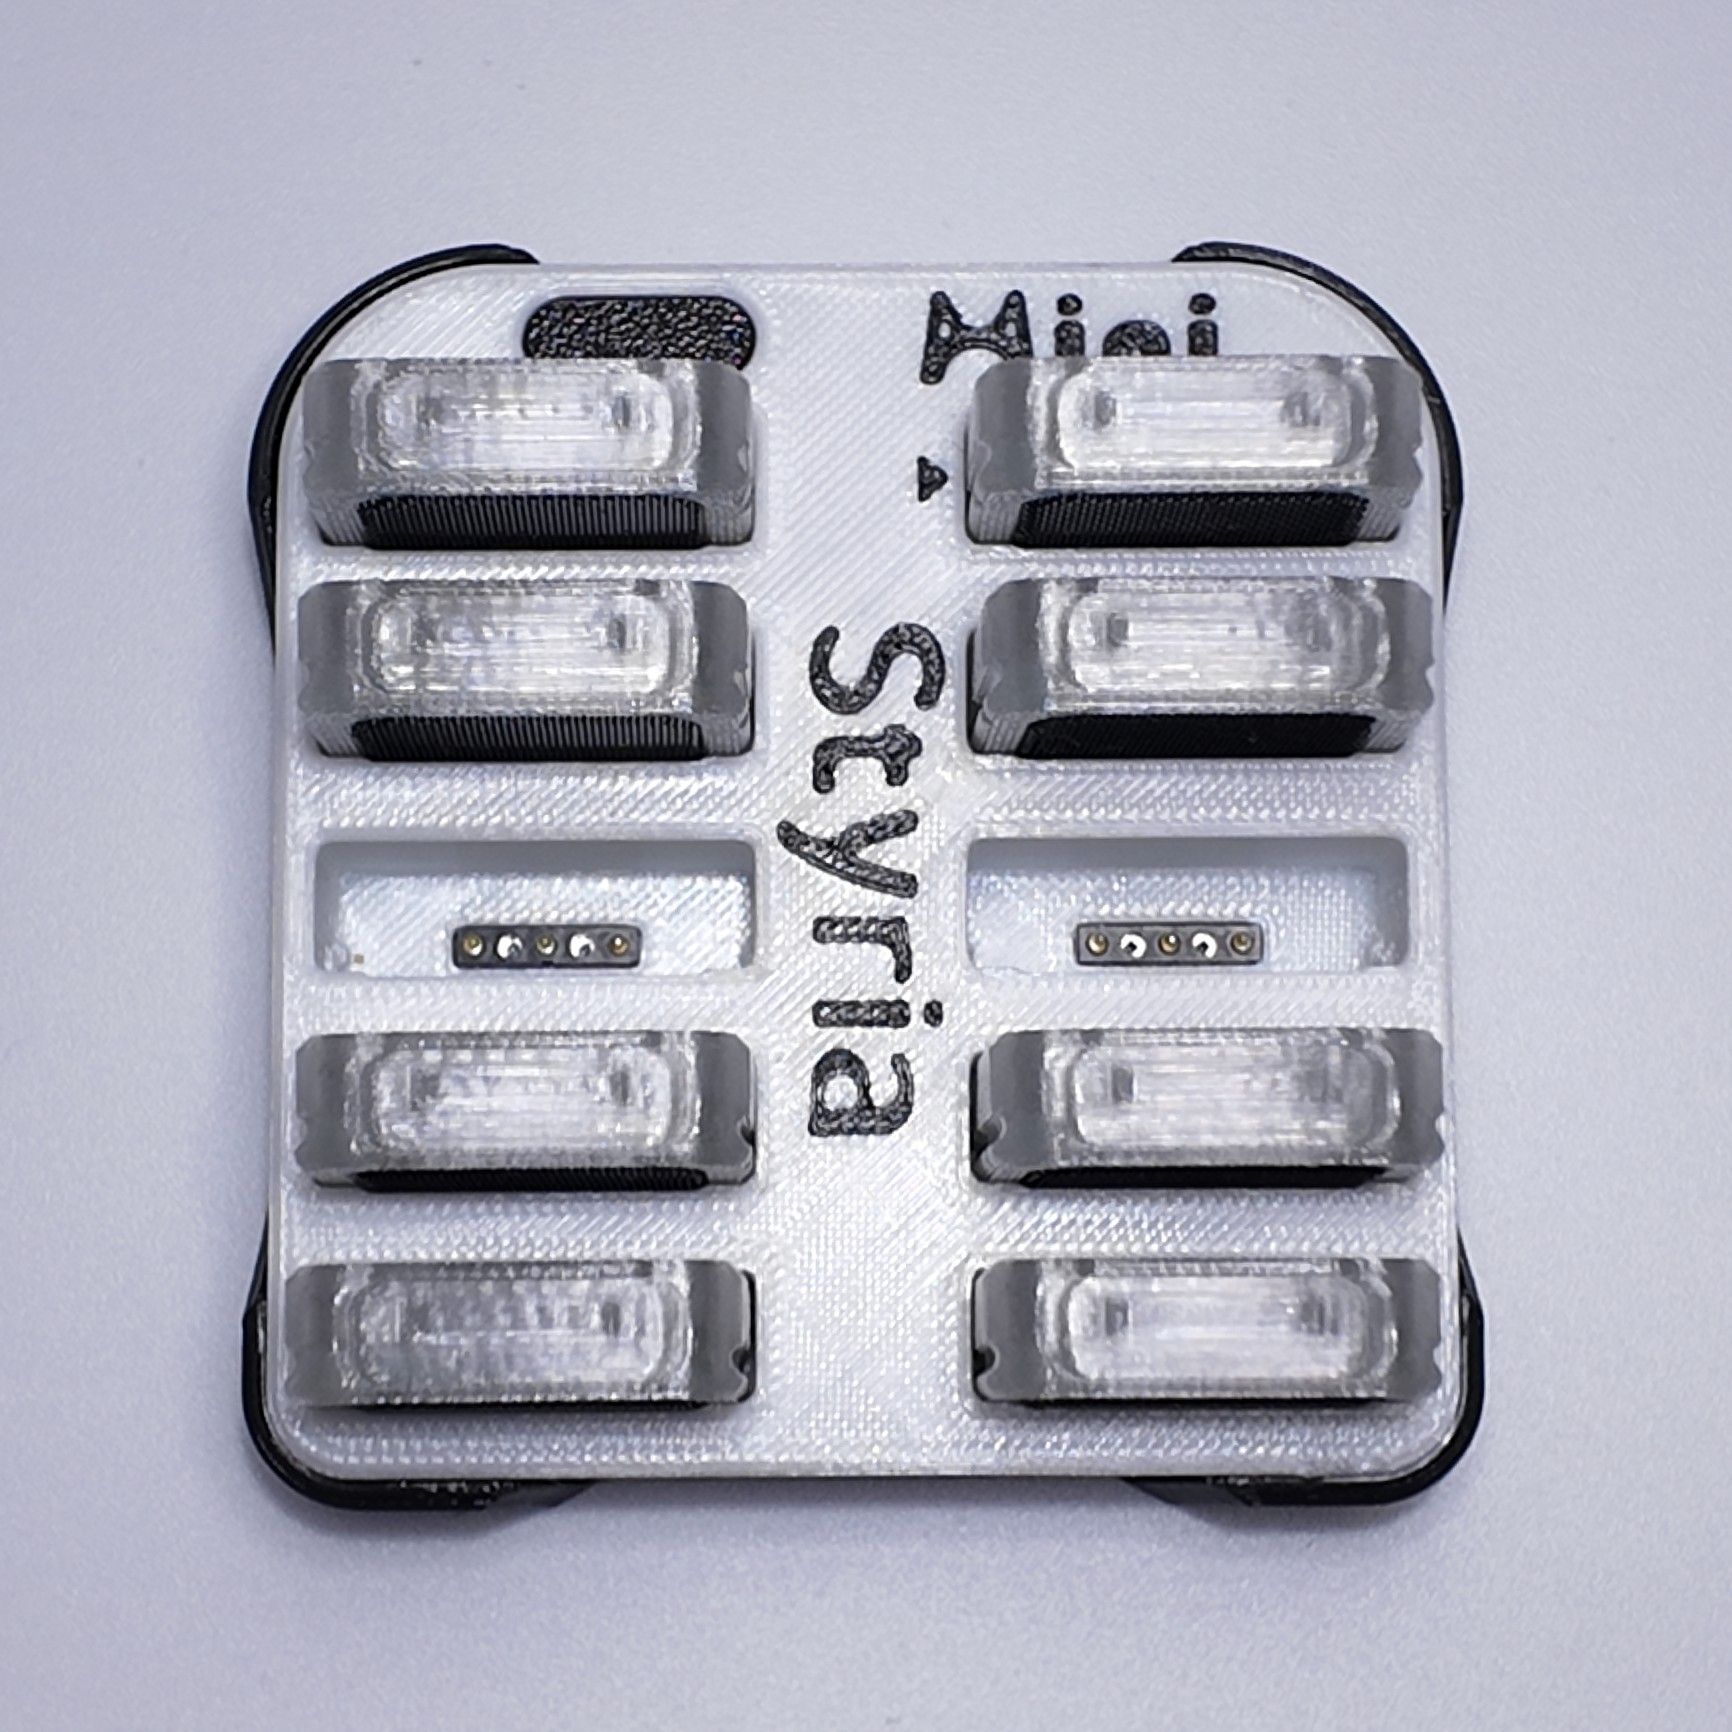
tracker(Velcro hook side, black) facing up, bring all trackers as close together as possible (refer to the placement method below), and place them in the previously foundcalibration area.
| 6-point | 8-point | 10-point |
|---|---|---|
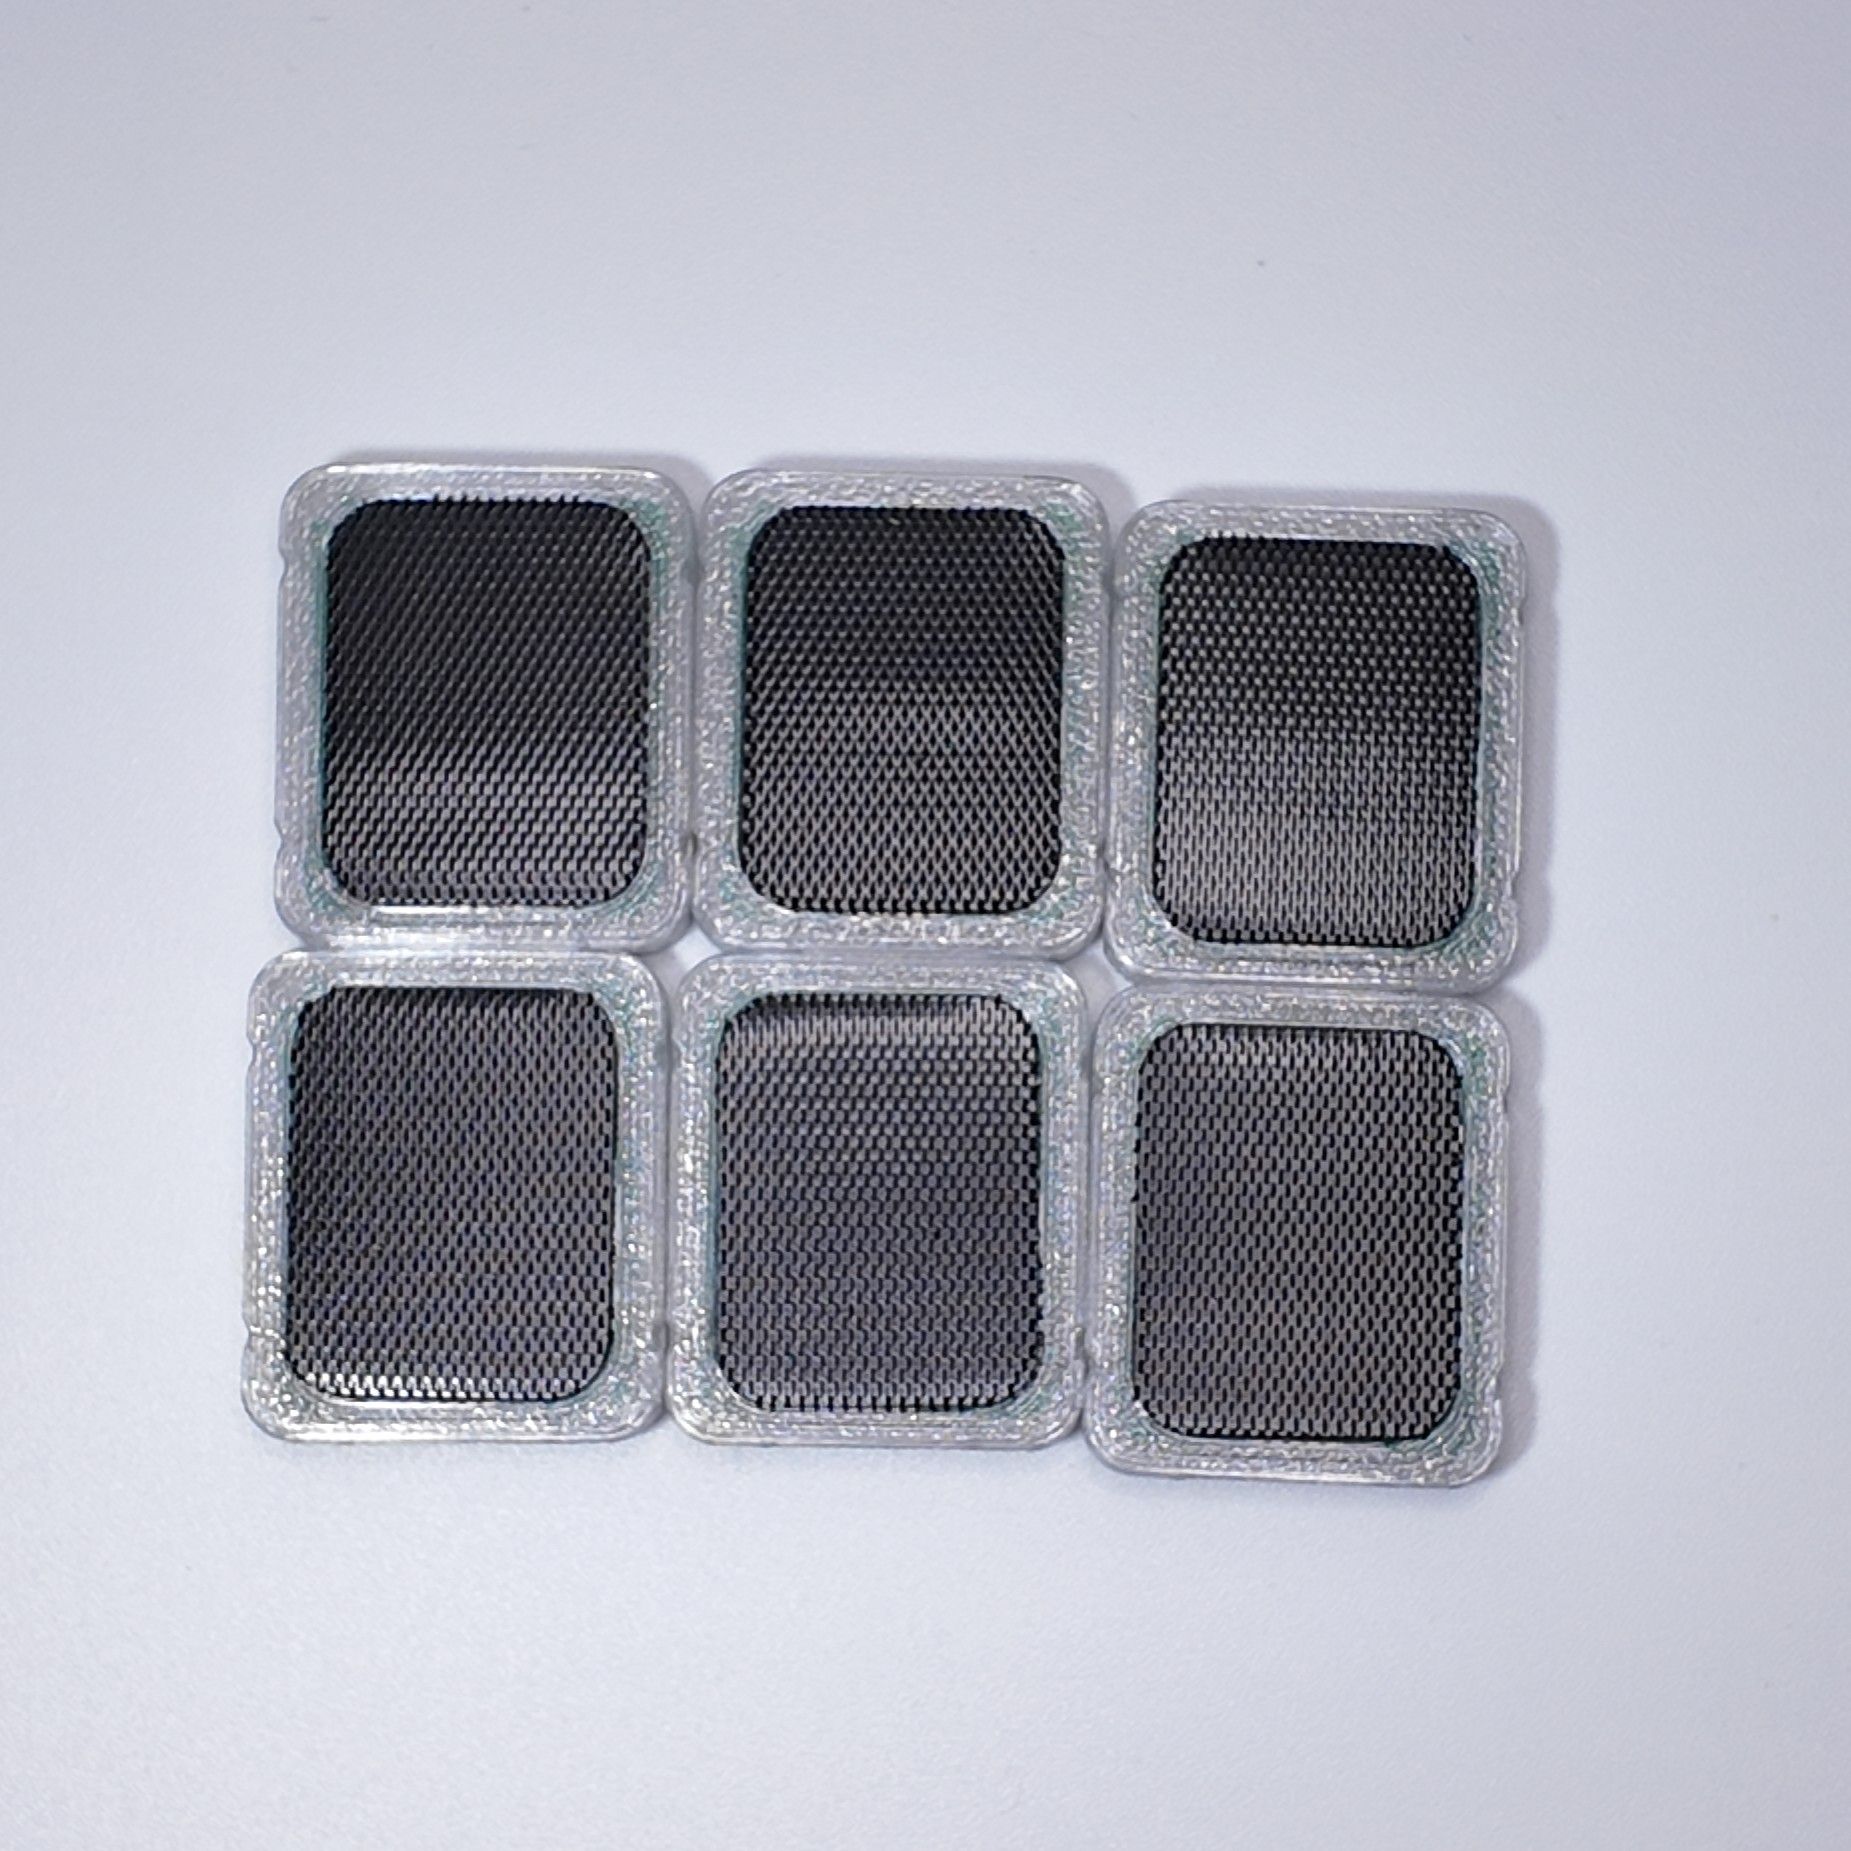 |
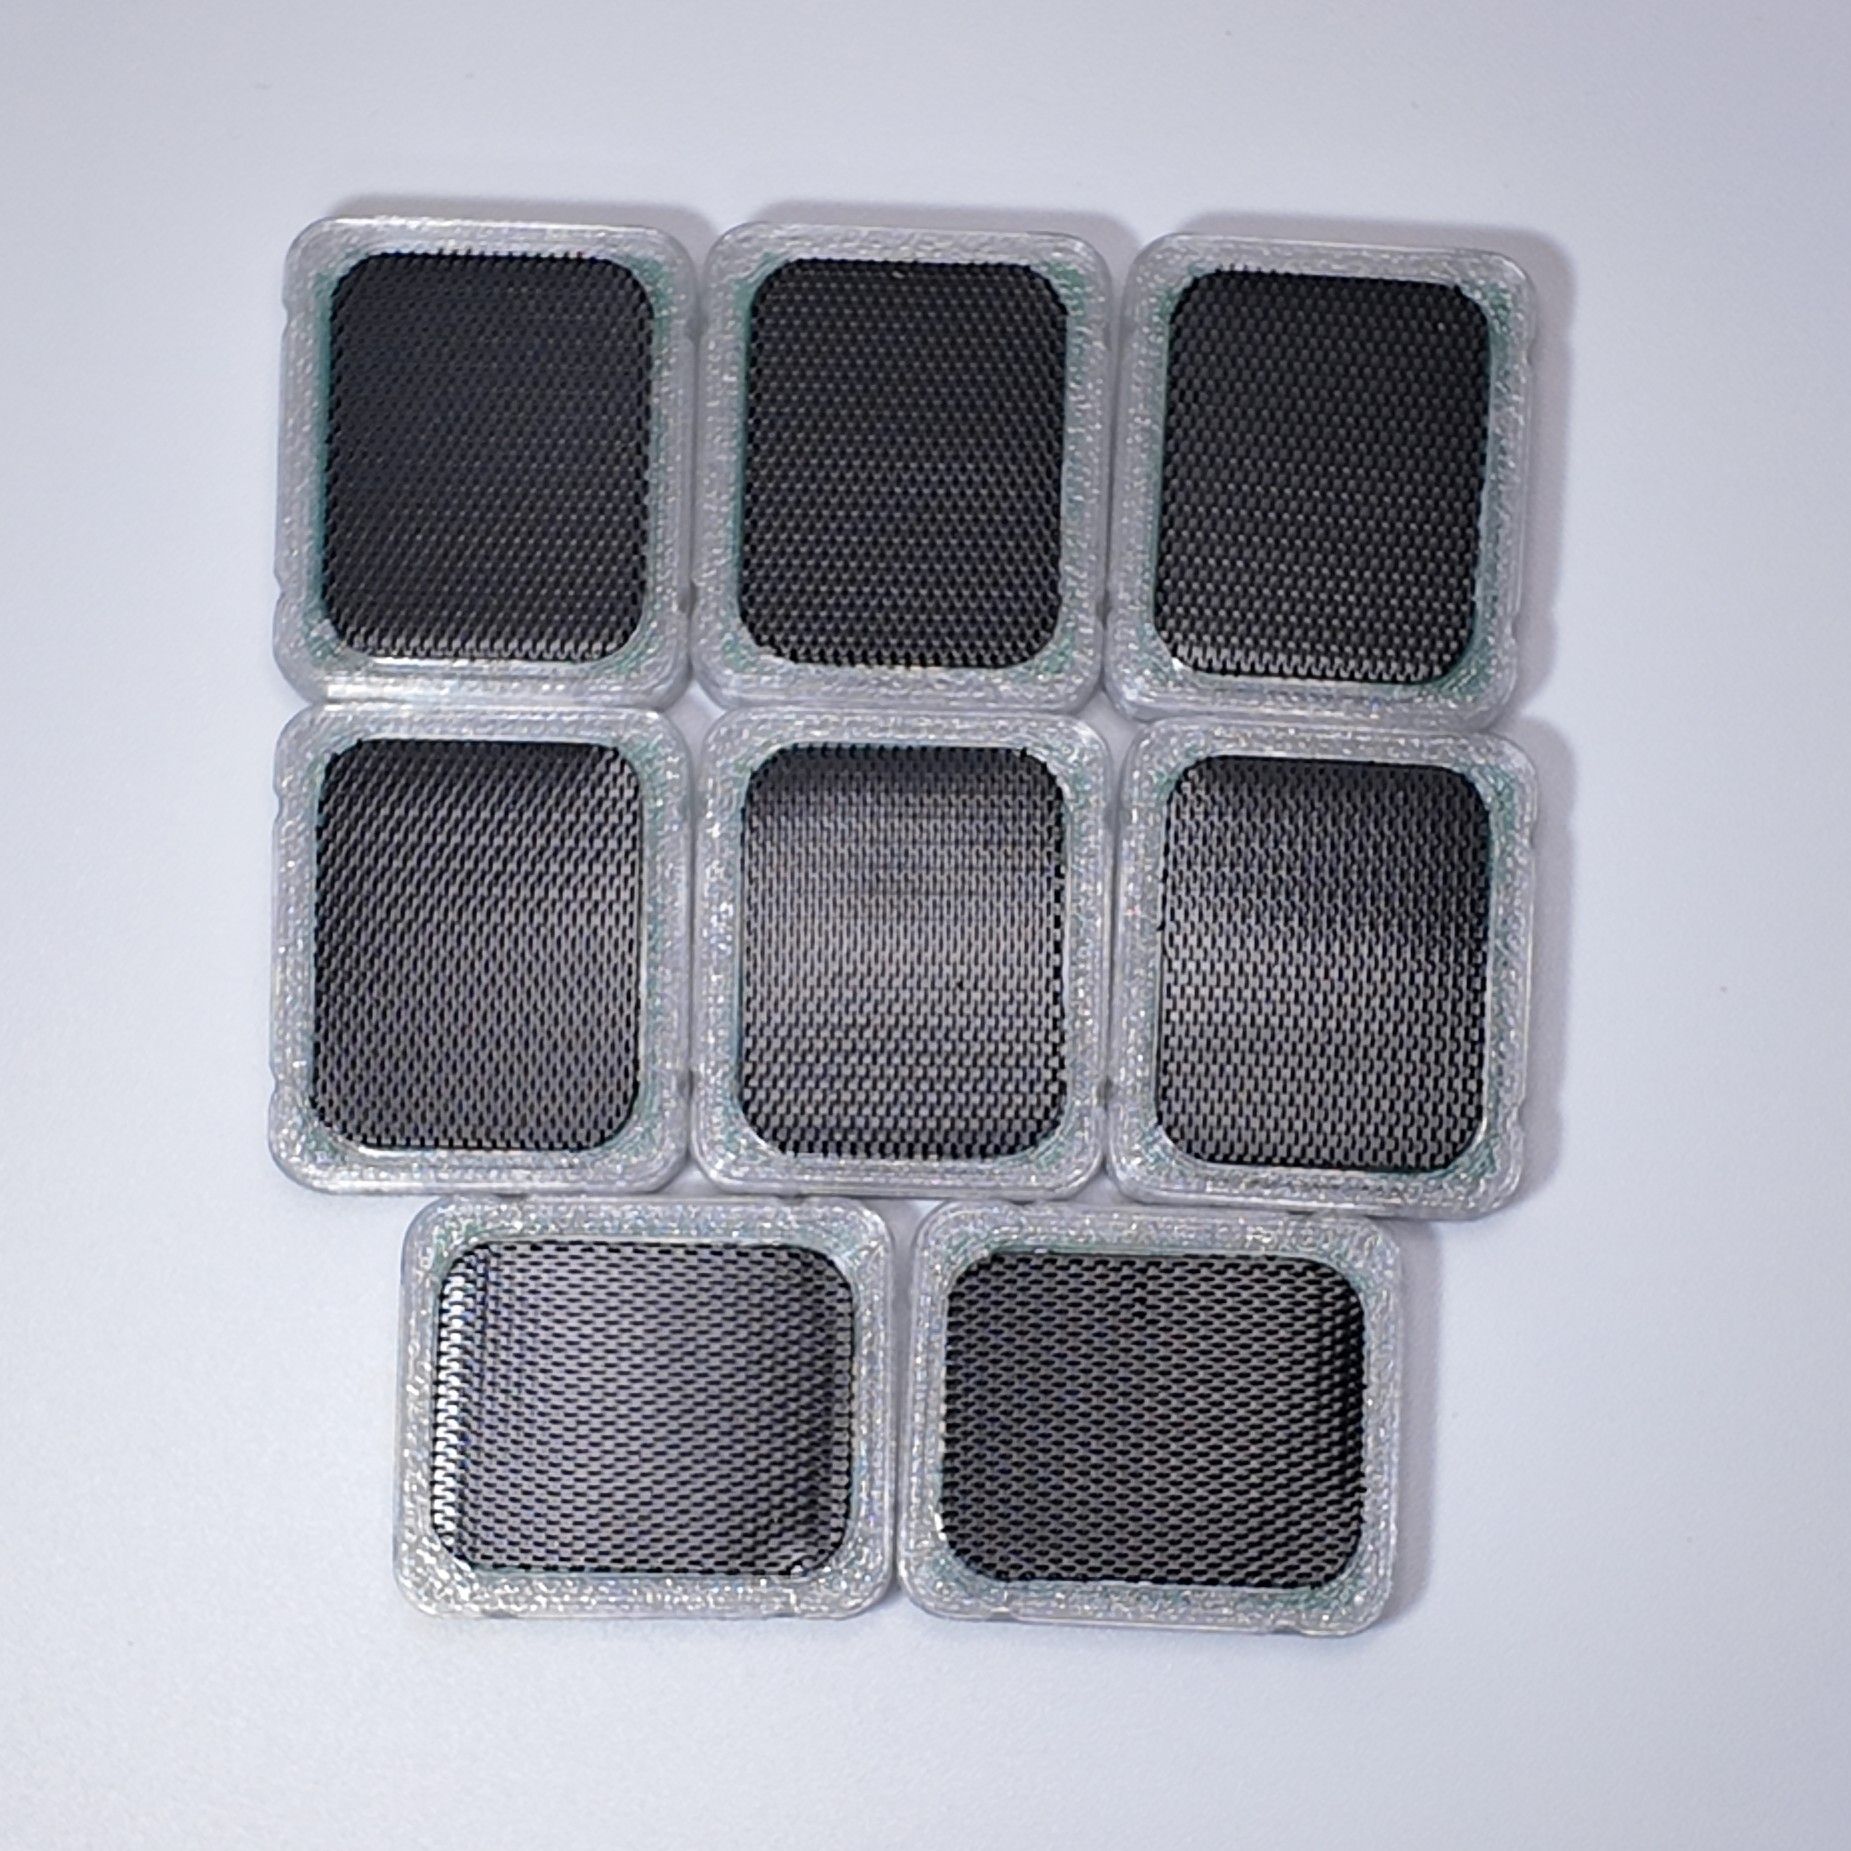 |
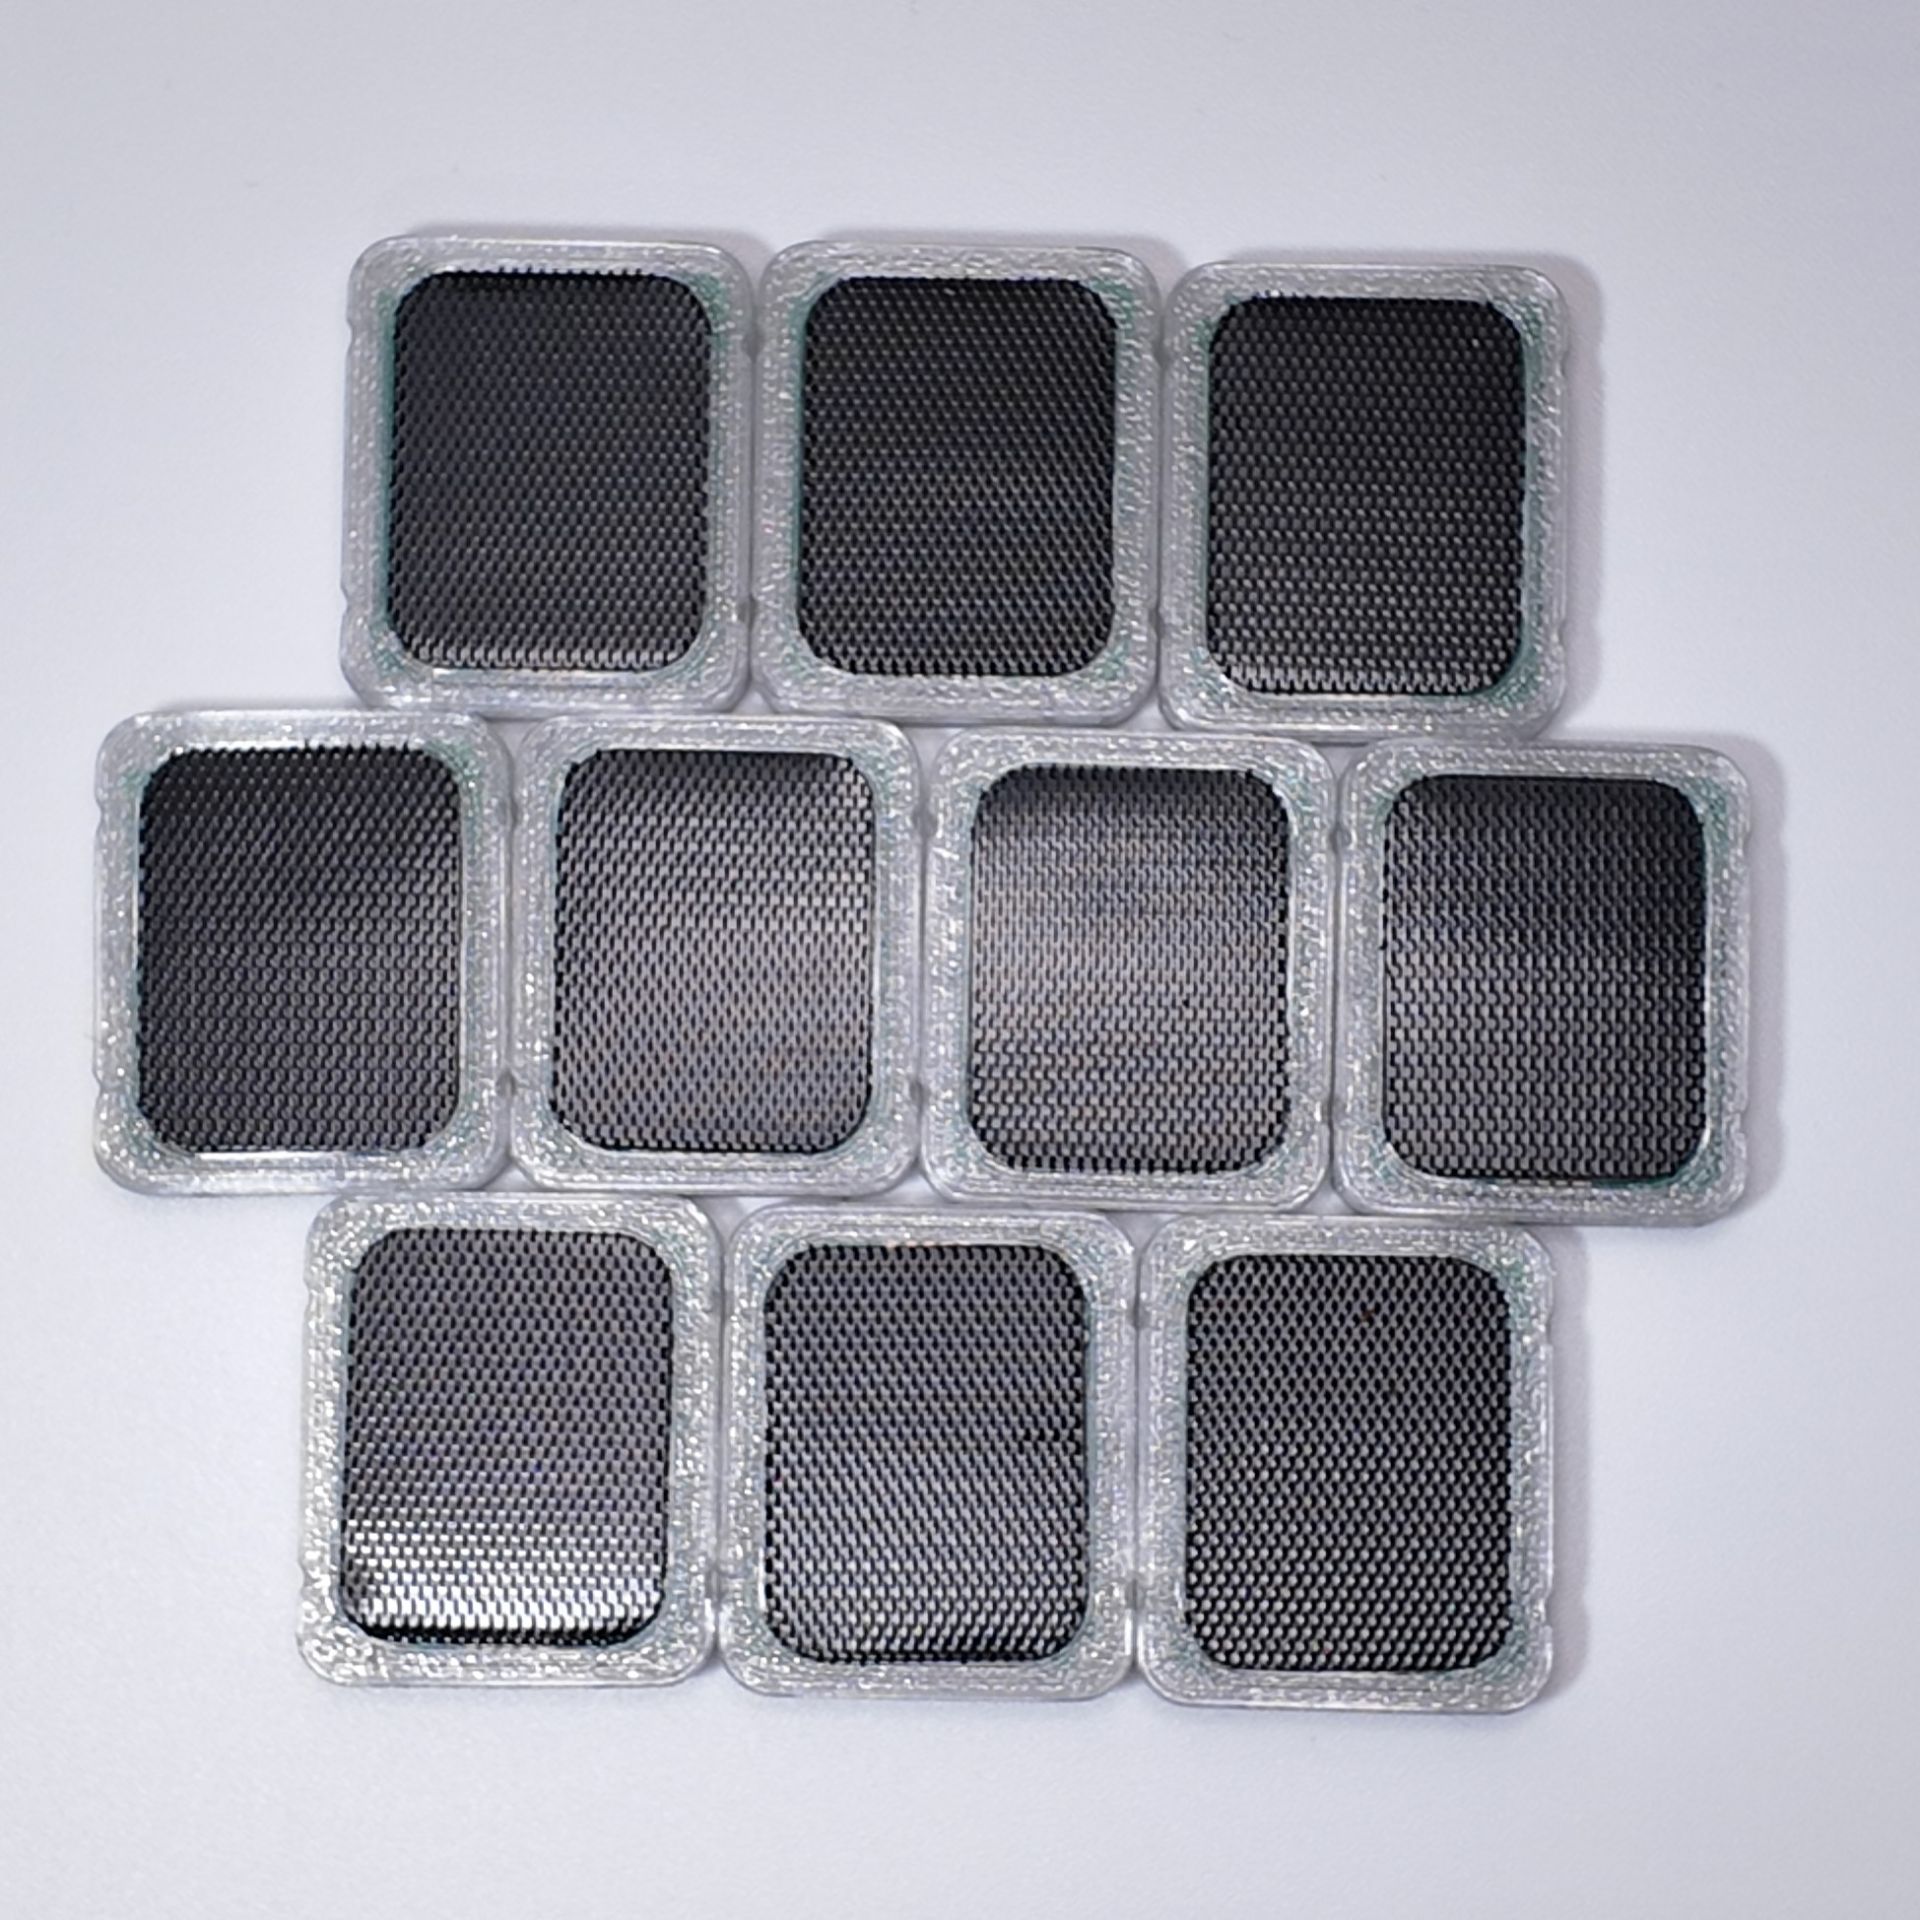 |
- Open the
StyriaMiniTooltool, switch to theDevice Calibrationpage, clickGyroscope Calibration - Enable Auto Calibration. Do not touch or move trackers during calibration.
Please do not unplug the
receiverduring calibration.
If you hold multiple sets of
receiverdevices, calibrate each set separately, andturn off / unplugthetrackersandreceivernot being calibrated.
- Leave the
trackersstationary in the calibration area for about6 minutesto allow them to recover room temperature. - Reference for LED status during calibration:
This LED description applies to version 260301 or earlier.
Version 260402 or higher has changed LED logic and may not stay constantly lit or flash continuously.
A small amount of failures and data loss generally does not affect the overall calibration result. Calibration can continue without termination.
| Phenomenon | Description |
|---|---|
blue light constantly lit |
Currently calibrating at this temperature point |
blue light flashes 4 times |
Current temperature point calibration successful |
blue light flashes 1 time every 10 seconds |
Normal operation / Current temperature point has been calibrated |
blue light constantly lit then suddenly off |
Tracker movement amplitude too large / temperature rise speed too fast, causing current temperature point calibration failure |
- Using the
hair dryer, set tolow speedheating,low speedairflow, with the air outlet about60 ~ 70cmfrom the tracker. Adjust the angle and ensure thehair dryerair outlet is aimed at thetrackers. Maintain for1 minute(use phone timer).
Please ensure the
hair dryerhas warm air before starting calibration. If not, adjust the settings appropriately.
Do not place the air outlet too close to the
tracker, as this may causepoor calibration resultsorcalibration failure.
Do not use
high speedheating, as this may cause thetrackerto overheat and be damaged.
- Adjust the
hair dryerposition, air outlet distance from tracker50 ~ 60cm. Adjust the angle and ensure thehair dryerair outlet is aimed at thetrackers. Maintain for1 minute(use phone timer). - Adjust the
hair dryerposition, air outlet distance from tracker40 ~ 50cm. Adjust the angle and ensure alltrackersreceive hot air. Maintain for2 minutes(use phone timer). - Adjust the
hair dryerposition, air outlet distance from tracker30 ~ 40cm. Adjust the angle and ensure alltrackersreceive hot air. Duringmedium distanceheating, you can slowly and gently move the hair dryer to control the blowing direction, so that alltrackersreceive uniform heating. Heating continues for3 minutes(use phone timer).
After this stage is complete, you should observe the temperature of each tracker in the SlimeVR application. If any of the following conditions appear, skip all subsequent heating steps:
- Any
trackertemperature exceeds42°C.- More than half of the
trackerstemperature exceeds36°C.
- Adjust the
hair dryerposition, air outlet distance from tracker20 ~ 30cm. Adjust the angle and ensure alltrackersreceive hot air. Test the temperature at this distance with your hand, ensuring the temperature is hot but not scalding. Duringmedium-close distanceheating, slowly move the hair dryer to control the blowing direction, so that alltrackersreceive uniform heating. Heating continues for2 minutes, do not exceed (use phone timer).
After this stage is complete, you should observe the temperature of each tracker in the SlimeVR application. If any of the following conditions appear, skip all subsequent heating steps:
- Any
trackertemperature exceeds42°C.- More than half of the
trackerstemperature exceeds36°C.
- Adjust the
hair dryerposition, air outlet distance from tracker15 ~ 25cm(do not go below15cm) and test the temperature at this distance with your hand, ensuring the temperature is hot but not scalding. Duringclose distanceheating, slowly move the hair dryer to control the blowing direction, so that alltrackersreceive uniform heating. Heating continues for1 minute, do not exceed (use phone timer).
After this stage is complete, you should observe the temperature of each tracker in the SlimeVR application. If any of the following conditions appear, skip all subsequent heating steps:
- Any
trackertemperature exceeds42°C.- More than half of the
trackerstemperature exceeds36°C.
- Maintain the
hair dryerposition, continue at: air outlet distance from tracker15 ~ 25cm(do not go below15cm) and test the temperature at this distance with your hand, ensuring the temperature is hot but not scalding. Duringclose distanceheating, slowly move the hair dryer to control the blowing direction, so that alltrackersreceive uniform heating. Heating continues for1 minute, do not exceed (use phone timer). - Turn off the
hair dryer, leave thetrackersstationary for about1 minute. - Open the
StyriaMiniTooltool, switch to theDevice Calibrationpage, clickGyroscope Calibration - Disable Auto Calibration. After trackers cool to room temperature (10 minutesor more), you can use the tracker normally or perform other calibration operations. - After
Advanced Calibrationis complete, you can choose to proceed with subsequentaccelerometer calibration.
¶ Accelerometer Calibration
This calibration has little impact on tracking performance. It is for reference and backup only, optional.
If you use
Gyroscope Calibration (Basic Calibration Guide), generally no need to recalibrate, unless the problem persists afterGyroscope Calibration (Basic Calibration Guide)is completed.
If you use
Gyroscope Calibration (Advanced Calibration Guide), to reduce errors,accelerometer calibrationmust be executed afterGyroscope Calibration (Advanced Calibration Guide), otherwise it may be worse.
Not applicable to old firmware versions. Using old firmware for calibration may make tracking performance worse. Please update firmware before calibration.
Firmware version requirement: not lower than v1.5.0_260130
¶ Download Tool
- Download the latest
StyriaMiniTooltool from the firmware update page for accelerometer calibration operations.
¶ Prepare Environment
Corner of a wallHeavy object(such asmobile phoneorwater bottle)
¶ Perform Calibration
- Find a stable hard wall corner (do not place on desk, try to avoid wooden floor) as the
calibration area.
You need to verify that when shaking the tracker at about
0~20cmabove thecalibration area, SlimeVR can normally recognize alltrackermovements.
If thetrackeris too far from thereceiveror severely occluded, calibration command reception may be affected, so it should be as close as possible.
- Insert all trackers into the charging dock, check each tracker connection:
Clickthe charging dock button, all indicator lights should illuminate. (Recommended insertion method can be referenced in the image below)
| 6-point | 8-point | 10-point |
|---|---|---|
 |
 |
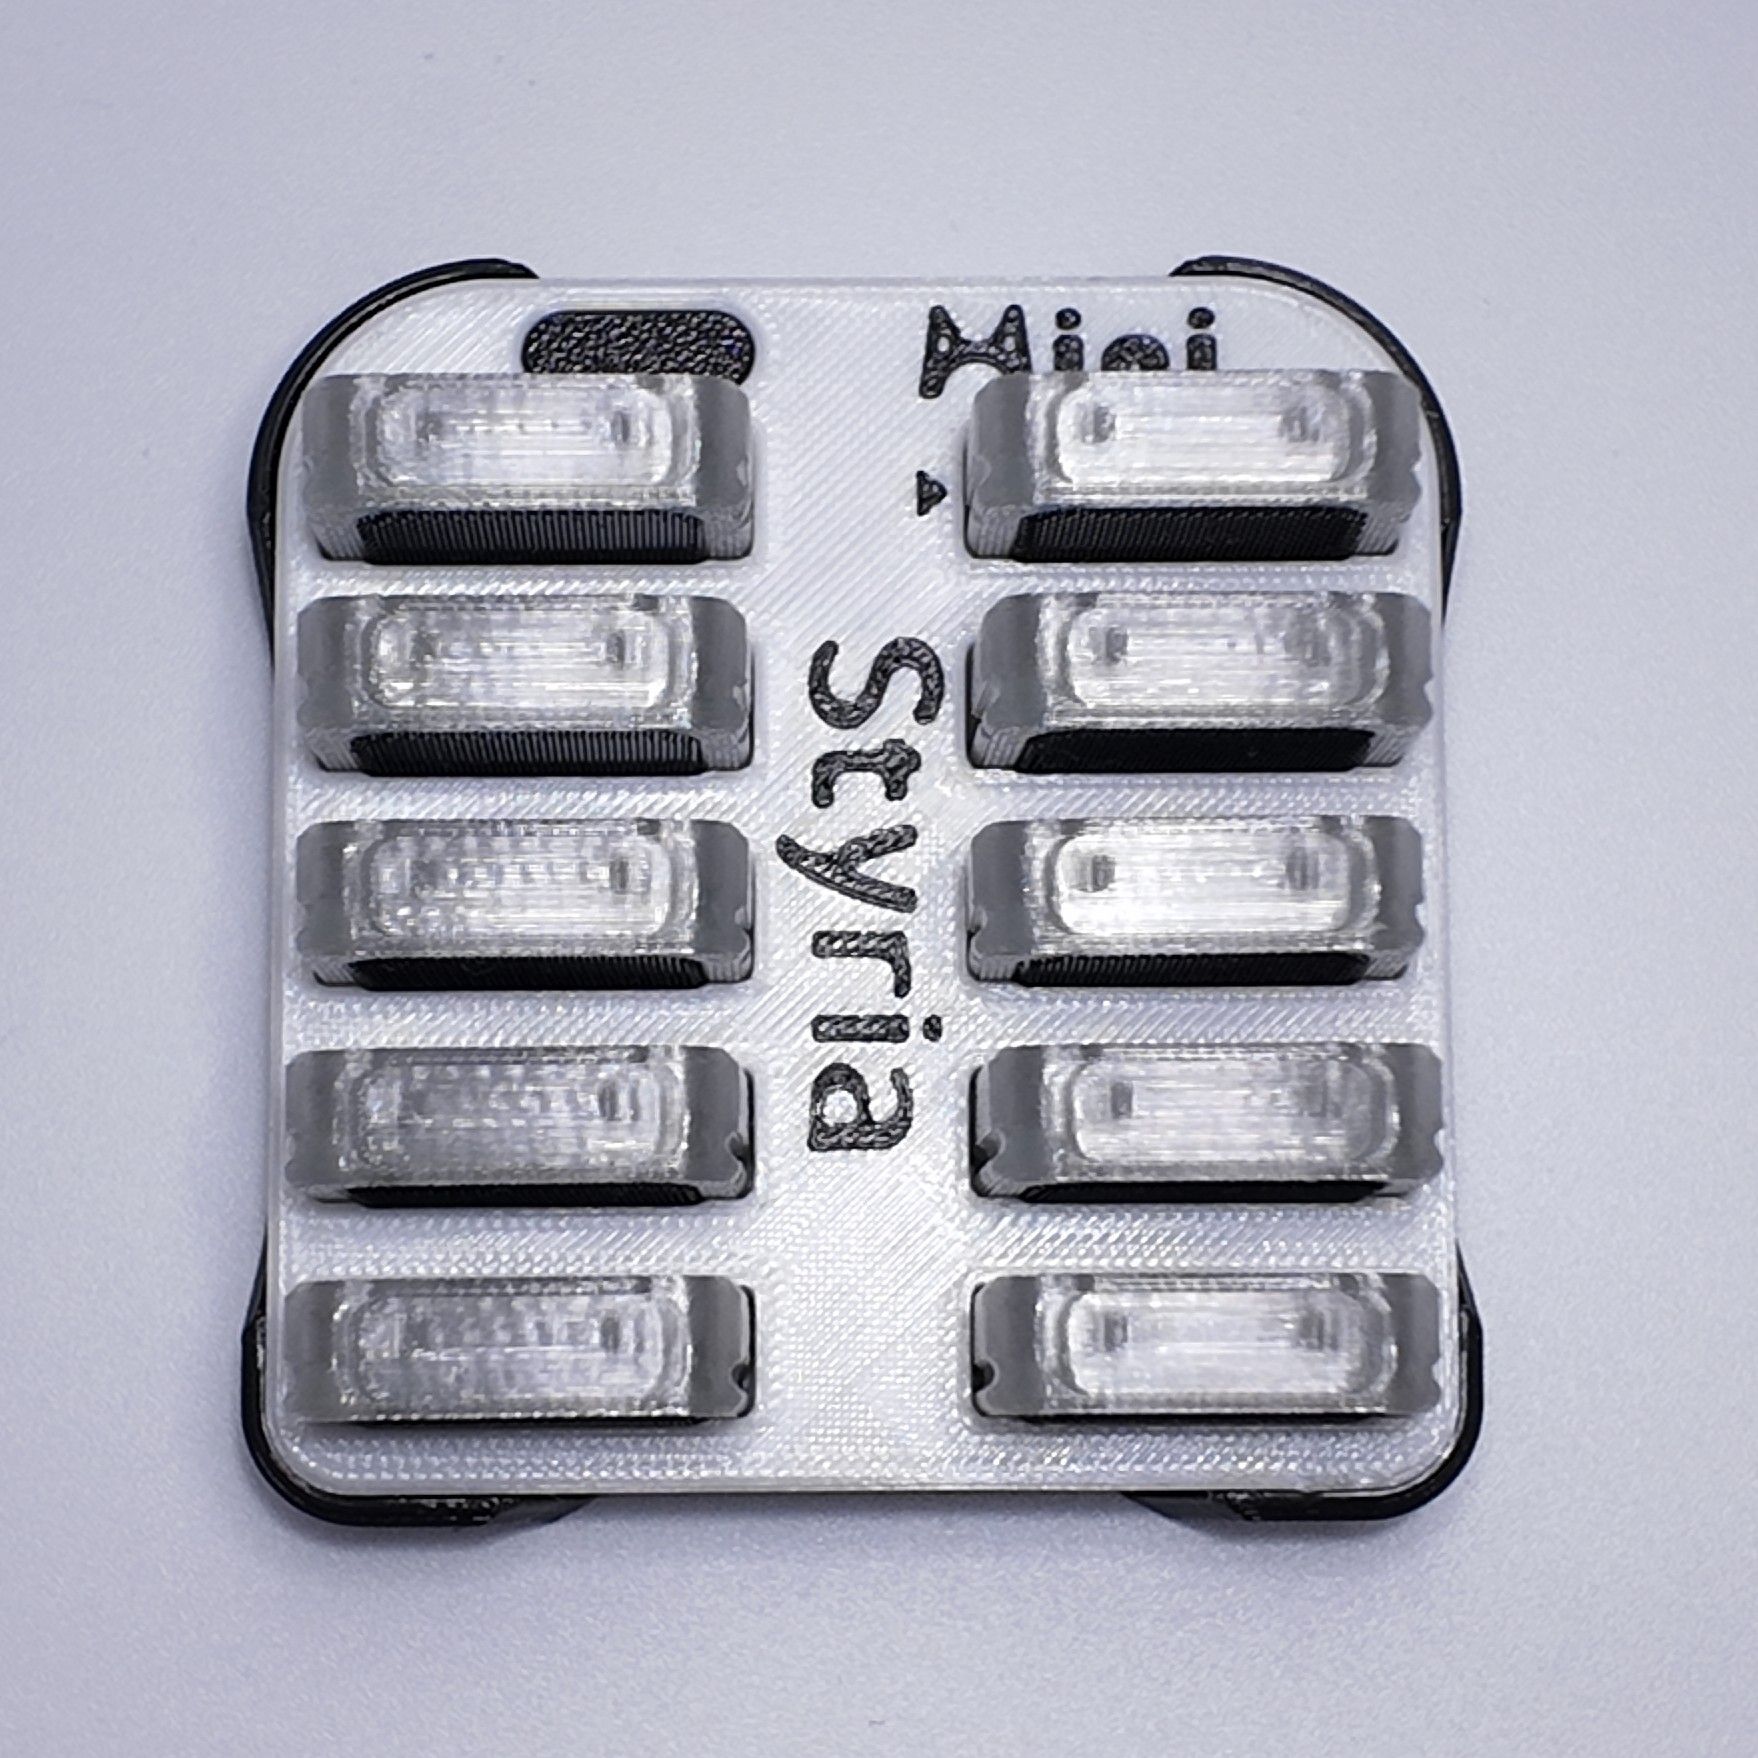 |
- Insert the
receiverinto the computer, open SlimeVR application. Shake thetrackersto ensure SlimeVR can normally recognizetrackermovements before calibration.
If you hold multiple sets of
receiverdevices, calibrate each set separately, andturn off / unplugthetrackersandreceivernot being calibrated.
- Open the
StyriaMiniTooltool, switch to theDevice Calibrationpage, clickAccelerometer Calibration - Clear Calibration, and clickYesto confirm.
- If you need to continue with
accelerometer calibration, proceed.- If you just want to clear
accelerometer calibrationdata, stop at this step.
-
Place the
charging dockwith insertedtrackerssteadily in the calibration area, then clickAccelerometer Calibration - Send Calibration.
-
Reference for LED status during calibration:
A small amount of failures and data loss generally does not affect the overall calibration result. Calibration can continue without termination.
| Phenomenon | Description |
|---|---|
blue light constantly lit |
Currently calibrating this face |
blue light flashing continuously |
Current face calibration successful / Current face already calibrated / Currently stationary or placement angle does not meet calibration conditions |
- By adjusting the
charging dockplacement angle, calibrate all trackers for18-side, i.e., the6 facesand12 edgesof the rectangular prism, each facing downward. Refer to the video below:
To abort calibration, please click the button on the
charging dockwith alltrackersinserted into thecharging dock. Or press the function button on eachtrackerto restart thetrackerand exit calibration mode.
v1.7.0_260301 or higher versions, after completing calibration of at least
6 faces, it will automatically exit and save data after about1 minute(if not completed, it will automatically exit calibration mode). However, we still recommend: calibrating as many faces as possible to reduce calibration errors.
- After
18-sidecalibration is complete, thetrackerswill automatically exit calibration status after flashing for a few seconds.