¶ Preface
For a better user experience, please read this entire user guide carefully.
If you encounter errors, faults, or poor tracking effects when
installing softwareorusing software, you can read the Troubleshooting Guide for quick diagnosis.
For content about
firmware update,after-sales support,troubleshooting,tracker calibration,pairing receiver,product repair, etc. You can find them all on the User Guide main page.
¶ Table of Contents
- Accessories List Learn about the accessories in your kit
- Feature Introduction Button and Indicator Light descriptions
- How to Wear Wearing methods and accessory usage instructions
- Using Software Software installation, initial setup, software usage instructions (Important)
¶ Accessories List
Accessories may vary by product batch, for reference only. Please refer to the accessories you received.
| No. | Item Name | 6-Point Set | 8-Point Set | 10-Point Set | Description |
|---|---|---|---|---|---|
| 1 | Tracker | 6 pcs | 8 pcs | 10 pcs | Captures your movements |
| 2 | Receiver | 1 pc | 1 pc | 1 pc | Receives data from trackers |
| 3 | 10-Point Charging Dock |
1 pc | 1 pc | 1 pc | Charges and manages trackers |
| 4 | 30CM/32CM Straps |
2 pcs | 4 pcs | 4 pcs | Secures trackers on arms, lower legs, feet etc. |
| 5 | 45CM Straps |
- | - | 2 pcs | Secures trackers on arms etc. |
| 6 | 56CM Straps |
2 pcs | 2 pcs | 2 pcs | Secures trackers on thighs, head etc. |
| 7 | 86CM Straps |
2 pcs | 2 pcs | 2 pcs | Secures trackers on chest, waist etc. |
| 8 | GoPro Style Chest Strap |
- | - | - | Secures chest mount base |
| 9 | Chest Mount Base | - | - | - | Backup mounting method for chest tracker |
| 10 | Hook Accessories | 6 pcs | 8 pcs | 10 pcs | Quick release support for straps |
| 11 | Base Accessories | 2 pcs | 2 pcs | 2 pcs | Backup mounting method for chest or waist trackers |
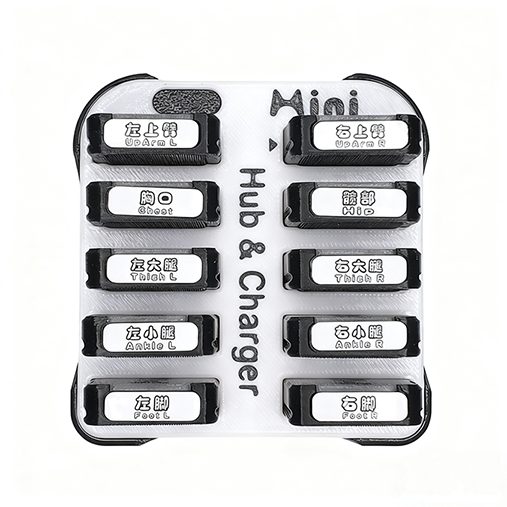
| 12 | Body Part Stickers | 1 sheet | 1 sheet | 1 sheet | Remembers which body parts your trackers are assigned to |
| 13 | Manual | 1 sheet | 1 sheet | 1 sheet | A regular manual that nobody reads |
| 14 | Carrying Case | 1 pc | 1 pc | 1 pc | Stores your trackers and accessories |
¶ Safety Instructions
- This product contains lithium batteries. You should follow lithium battery usage guidelines when using it.
- Avoid charging in high temperature conditions (such as direct sunlight, hot environments, etc.).
- Normal usage/charging/storage temperature should be:
5~35 °C. - Avoid piercing and dropping. If you find any abnormality such as battery deformation, swelling, damage, etc., stop using immediately.
¶ Feature Introduction
¶ Overview
¶ Tracker
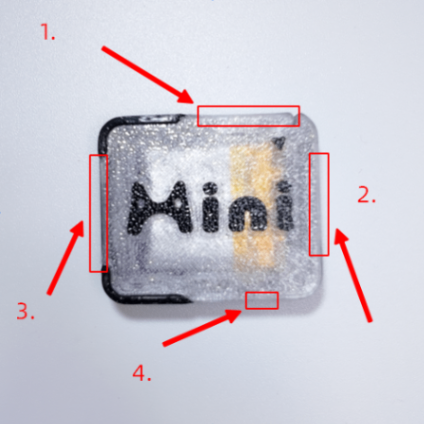
- Side is:
Function Button, details in "Function Button Description" below. - Side is:
Charging Contacts, used for tracker charging and data transmission. - Side is:
Sticker Paste Position, for pasting stickers to distinguish tracker body parts. - Side is:
Reset Button, used for maintenance and reset in special situations. You can use atoothpickorSIM card pinto press the button inside the side hole at this position, see "Reset Button Description" below (some trackers without this button is normal).
¶ Button Descriptions
Please read this section carefully. Incorrect button presses may affect your normal use of the device.
For items marked
Proceed with Caution, please strictly follow the requirements in documents such asDevice PairingandFirmware Update. Otherwise, it may affect usage.
¶ Tracker
After correctly inserting all trackers into the charging dock, you can control all trackers through the dock.
- When trackers on the charging dock have inconsistent power states, directly long-pressing the button may not turn off all trackers.
- In this case: it is recommended to click the button once to
Power On/Wakeall trackers, wait more than 2 seconds, then long-press the button to turn off all trackers.
¶ Function Button Description
| Operation | Function Description | Notes |
|---|---|---|
| Single click | Start or restart tracker, and light up status indicator | - |
| Double click | Tracker flashes then stays on, enters calibration mode. Place tracker on flat stable surface for about 15 seconds | Proceed with Caution, if entered accidentally, you can click the button to restart device before calibration completes. If calibration is done, please re-calibrate according to "Device Calibration" |
| Triple click | Enter pairing mode, indicator flashes once per second | Proceed with Caution, to exit pairing mode, click button to restart device. For pairing devices, see "Pairing Receiver" |
Long press 2-3 seconds |
Indicator gradually dims and turns off, device powers off (recommended: click button to Power On / Wake all trackers, wait 2 seconds or more before long pressing button to turn off all trackers.) |
- |
Long press 5 seconds or more |
Indicator gradually dims and turns off, then flashes 3 times sequentially, followed by fast flashing 2 times, at which point pairing with receiver is cleared and enters pairing mode (blue light flashes once per 1 second) |
Proceed with Caution, if pairing is accidentally cleared or already in pairing mode, please see: "Pairing Receiver", re-pair device |
Click button 6~7 times continuously |
Enter firmware upgrade (DFU) mode | Proceed with Caution, upgrading wrong firmware may damage your device. For firmware upgrade, see "Firmware Update Guide" |
¶ Reset Button Description
| Operation | Function Description |
|---|---|
| Single click | Power off and restart tracker, used for dead lock and other very rare special situations |
| Double click | Enter firmware upgrade (DFU) mode, can exit by clicking button |
¶ Receiver
| Operation | Function Description | Notes |
|---|---|---|
| Double click | Exit pairing mode | If already in pairing mode, indicator flashes twice then turns off, exits pairing mode |
| Triple click | Enter pairing mode | Indicator flashes once per second |
| Long press (about 6~8 seconds) | Clear all paired trackers, indicator flashes once per second | Proceed with Caution, for pairing devices, see "Pairing Receiver" |
| Long press (10 seconds or more) | Enter firmware upgrade (DFU) mode | Proceed with Caution, if entered accidentally, unplug receiver and reinsert into computer. For firmware upgrade, see "Firmware Update Guide" |
¶ Indicator Lights
Indicator light status may vary with firmware version, for reference only.
¶ Tracker
| Phenomenon | Meaning | Description |
|---|---|---|
Blue light flashes once per 10 seconds |
Normal operation | - |
Blue light flashes once per 1 second |
Entered pairing mode / Low battery | If in pairing mode: click button to cancel and exit |
Blue light flashes fast 4 times |
In pairing mode: paired with receiver | Click button to complete and exit |
Blue light continuous fast flashing |
If still fast flashing after removing from charging dock, entered firmware upgrade mode | Remove tracker from dock, double click button to exit; if cannot exit, see "Firmware Update Guide", re-flash firmware |
Blue light flashes twice per 5 seconds |
Sensor error | See Self Repair Guide to remove and reinstall battery. Avoid bumping, dropping and squeezing when using tracker. Cannot use reset button |
Blue light flashes three times per 5 seconds |
Connection error | Not connected to receiver, you can click tracker function button to restart within receiver signal range to connect to receiver |
Blue light slow breathing |
Charging in progress | Managed by tracker main control chip, breathing means main control and firmware working normally |
Red light on |
Charging in progress | Managed by tracker charging chip, red light and blue light on simultaneously is normal. Since red light is very obvious, you should carefully observe blue light to confirm specific working status |
Red light off |
Charging complete | - |
¶ Receiver
| Phenomenon | Meaning | Description |
|---|---|---|
Blue light flashes once per 10 seconds |
Normal operation | - |
Blue light flashes once per 1 second |
Entered pairing mode | Double click button to exit |
Blue light flashes 2 times |
Exited pairing mode | - |
Red light and Blue light on |
Entered firmware upgrade mode | Unplug receiver to exit |
¶ Device Charging
- Please use: voltage supports
5V, brand charger with maximum output current greater than1A.- Connect charger data cable to the
Type-Cport of charging dock.- Insert trackers into charging dock to charge.
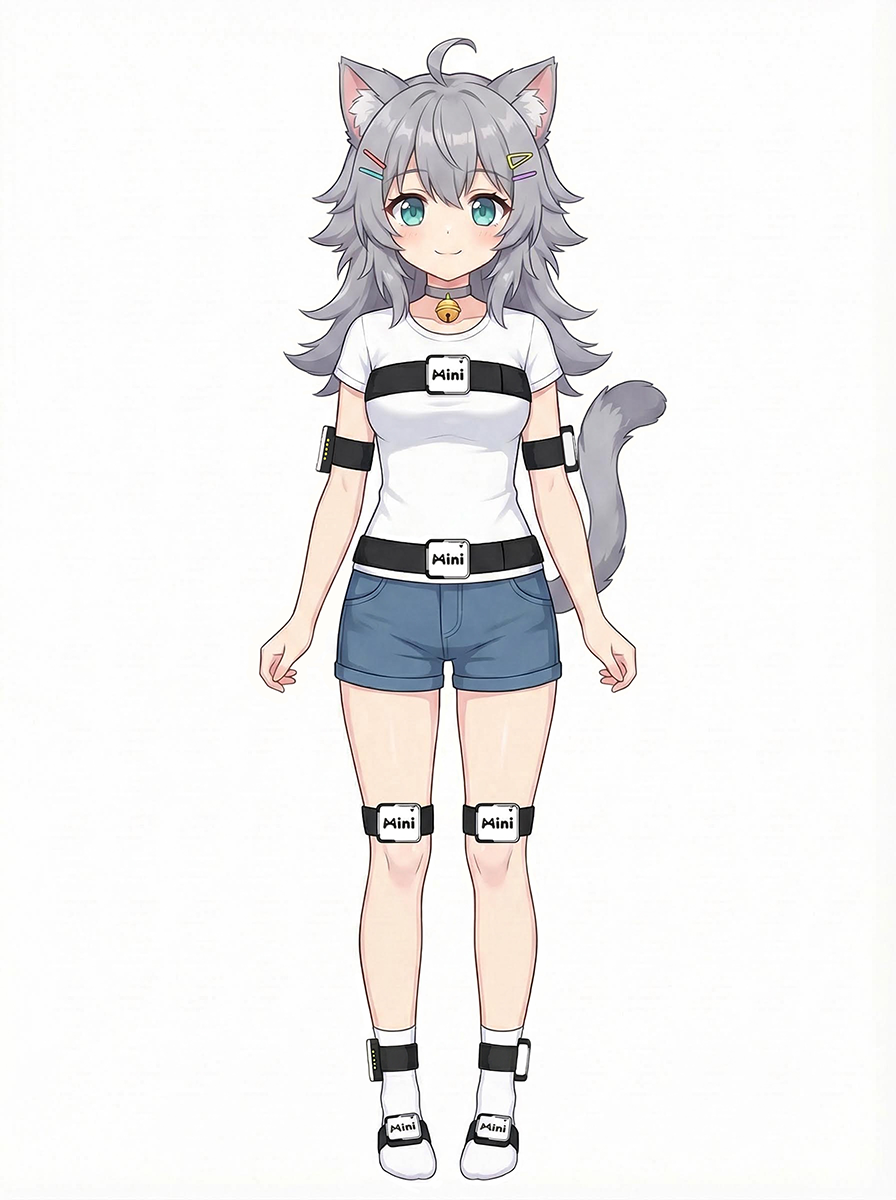
¶ How to Wear
The wearing methods below are only for reference. Specific wearing methods are not limited, as long as it works normally.
When wearing trackers, please avoid inconsistent wearing height on the same body part for leg or arm trackers. This may affect tracking performance.
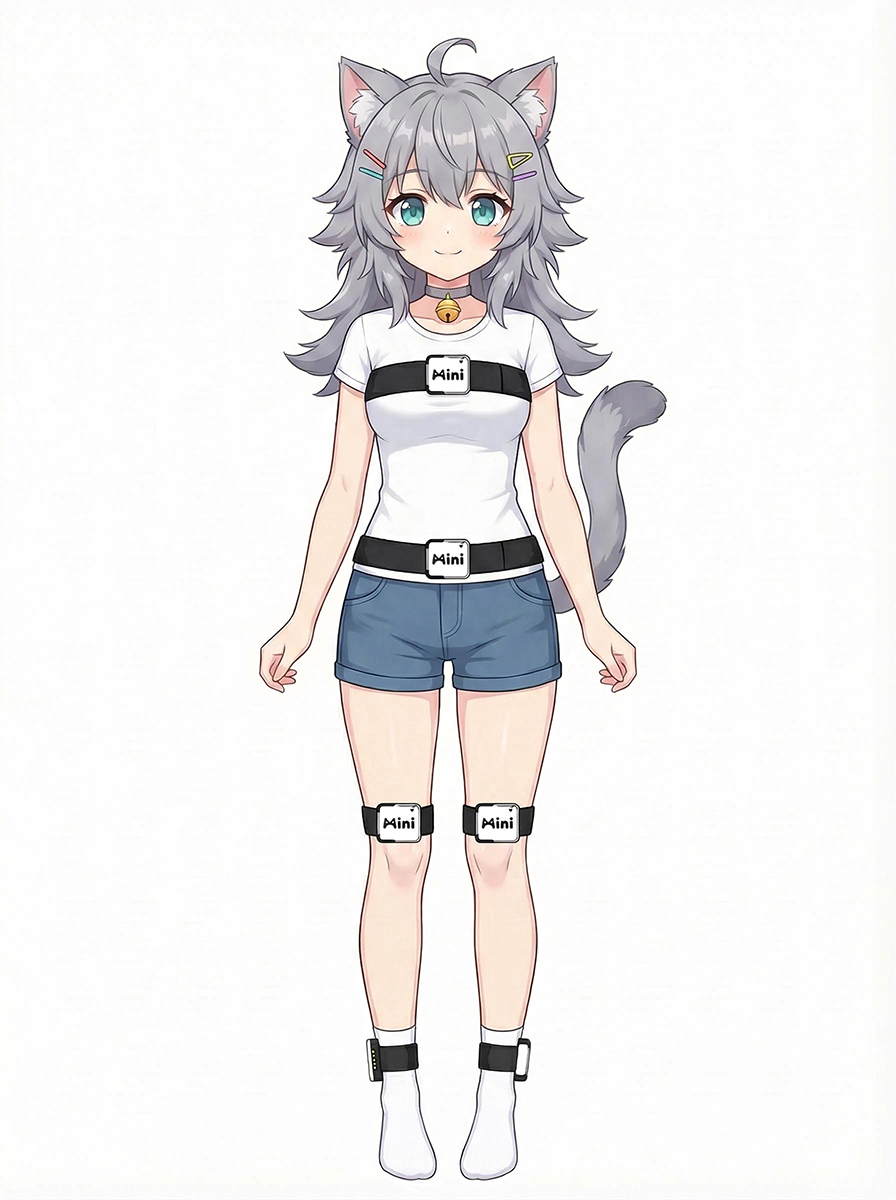
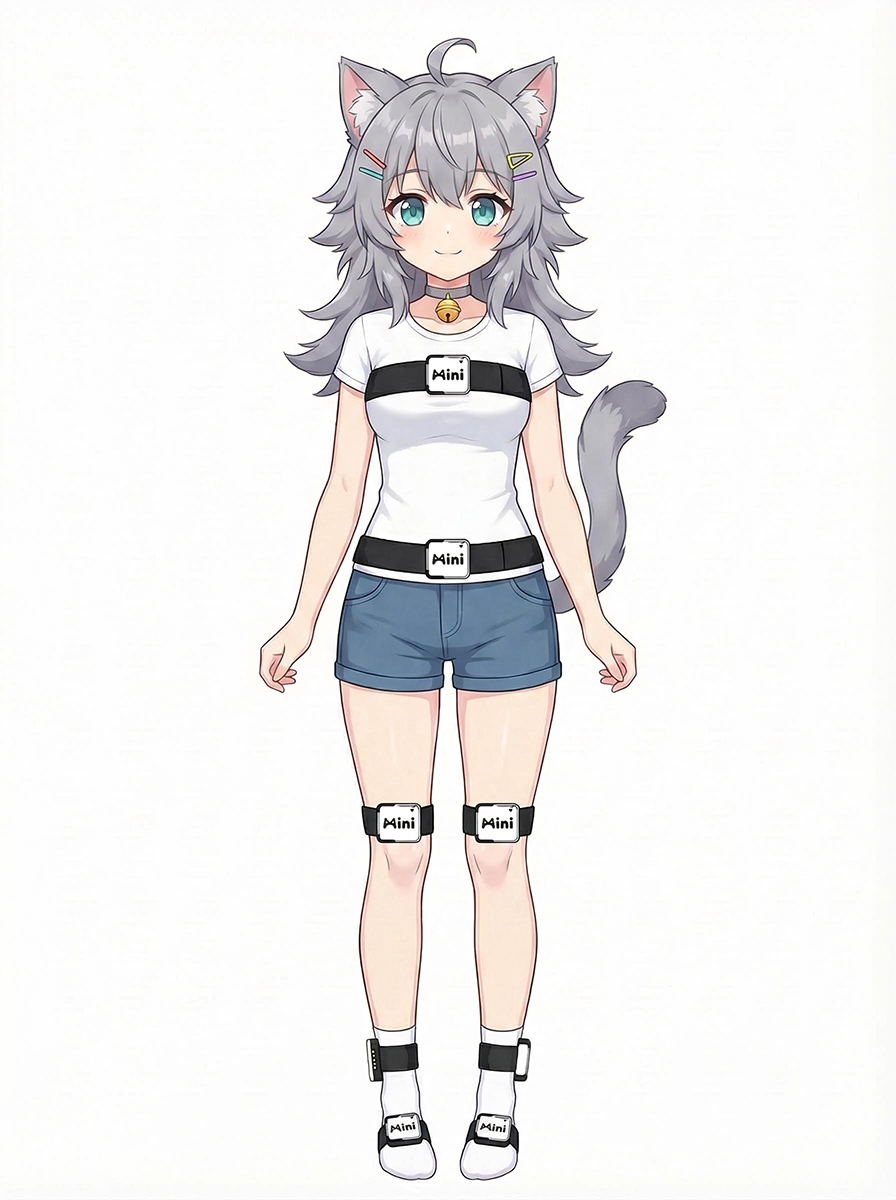
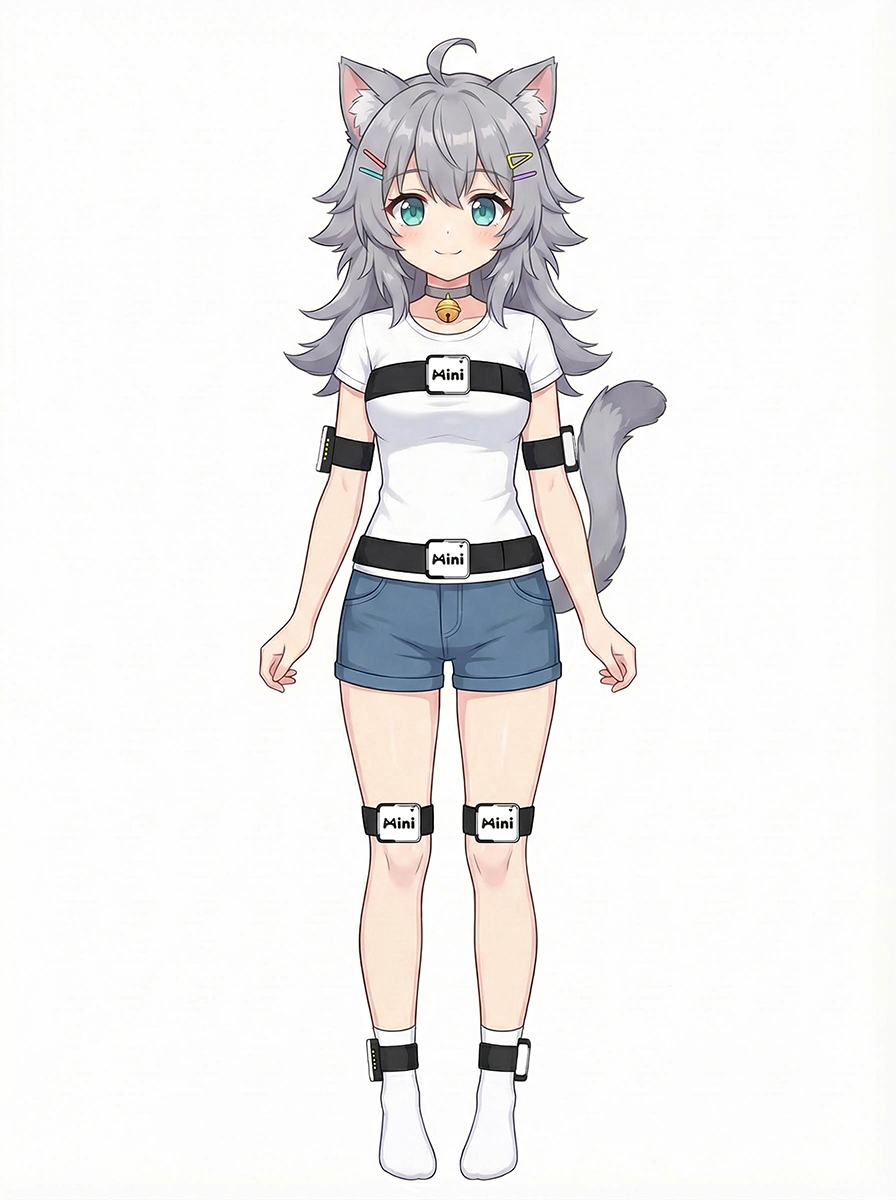
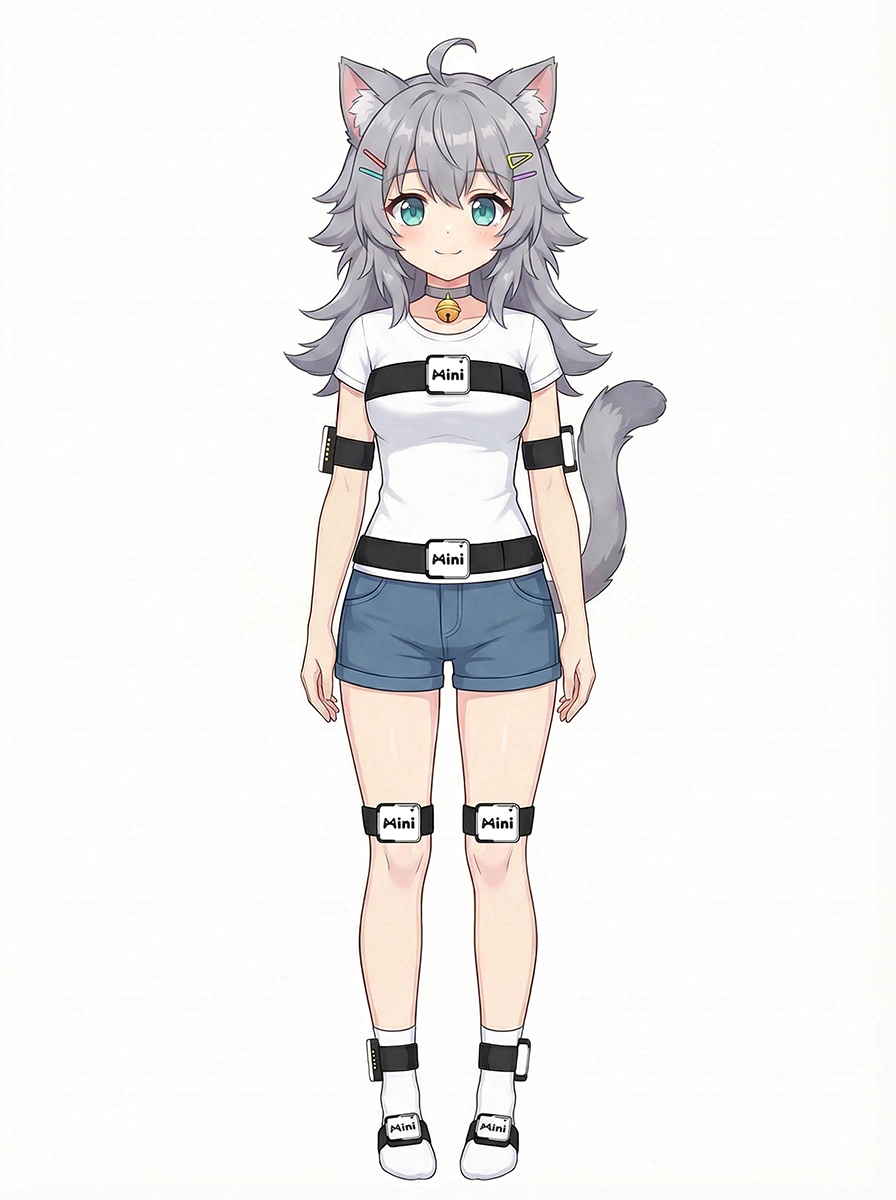
¶ Wearing Diagrams
Feetandarmsare recommended to wear on thesidein the corresponding direction.Other body partsare recommended to wear on thefront.
| 6-Point | 8-Point (Feet) | 8-Point (Arms) | 10-Point |
|---|---|---|---|
 |
 |
 |
 |
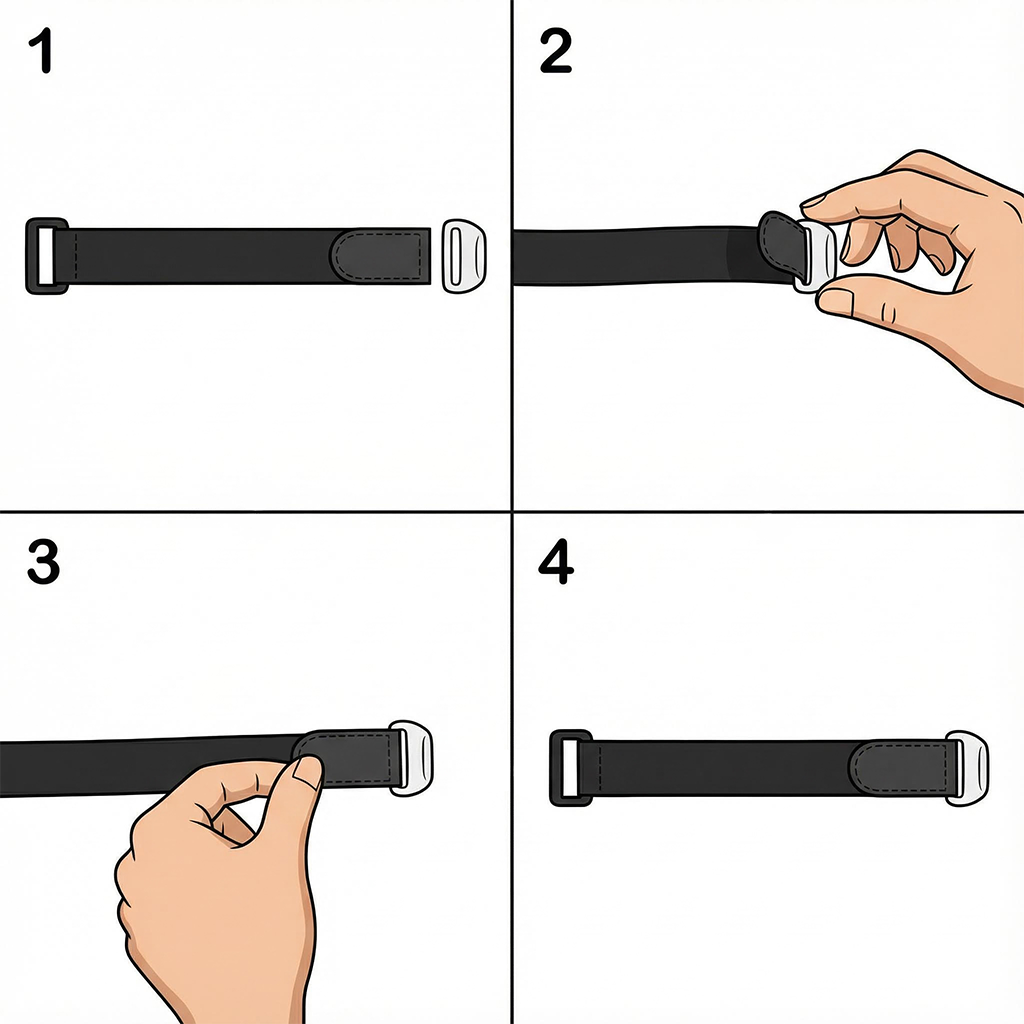
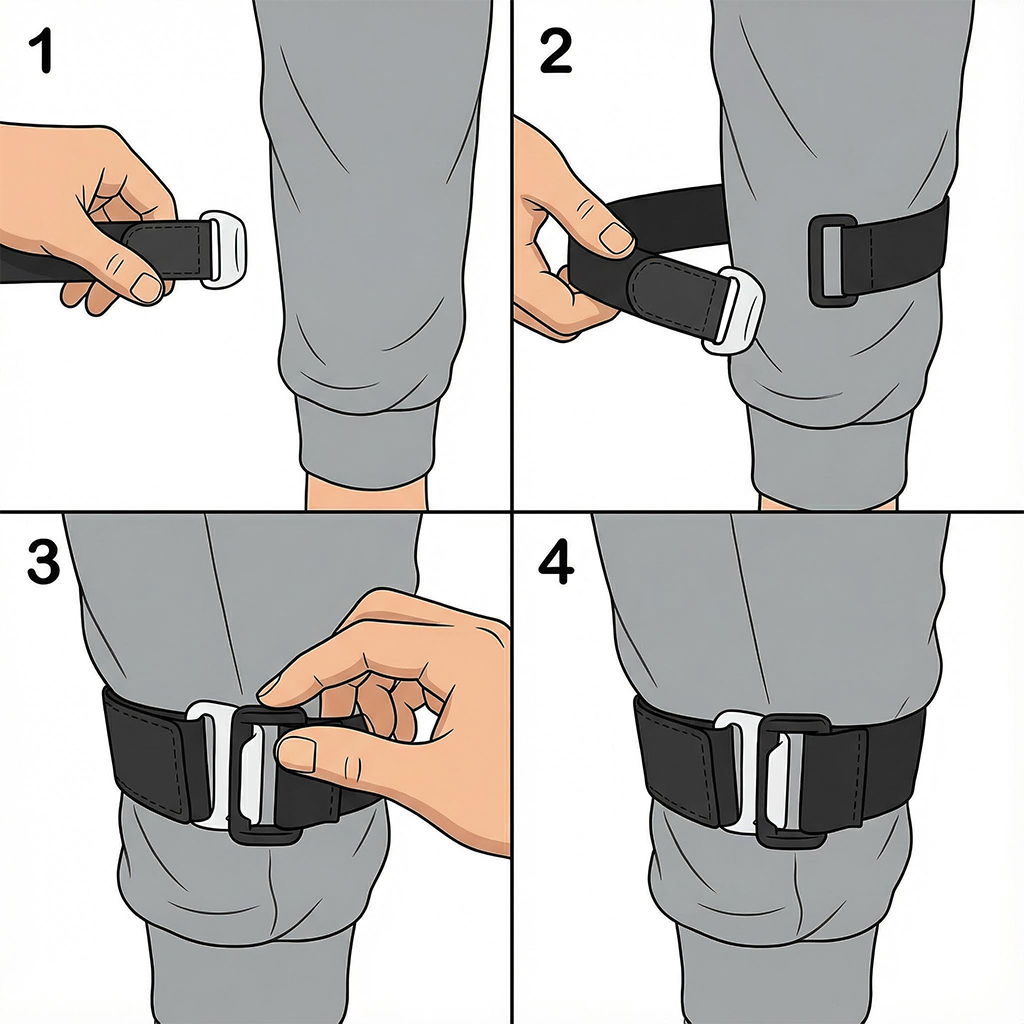
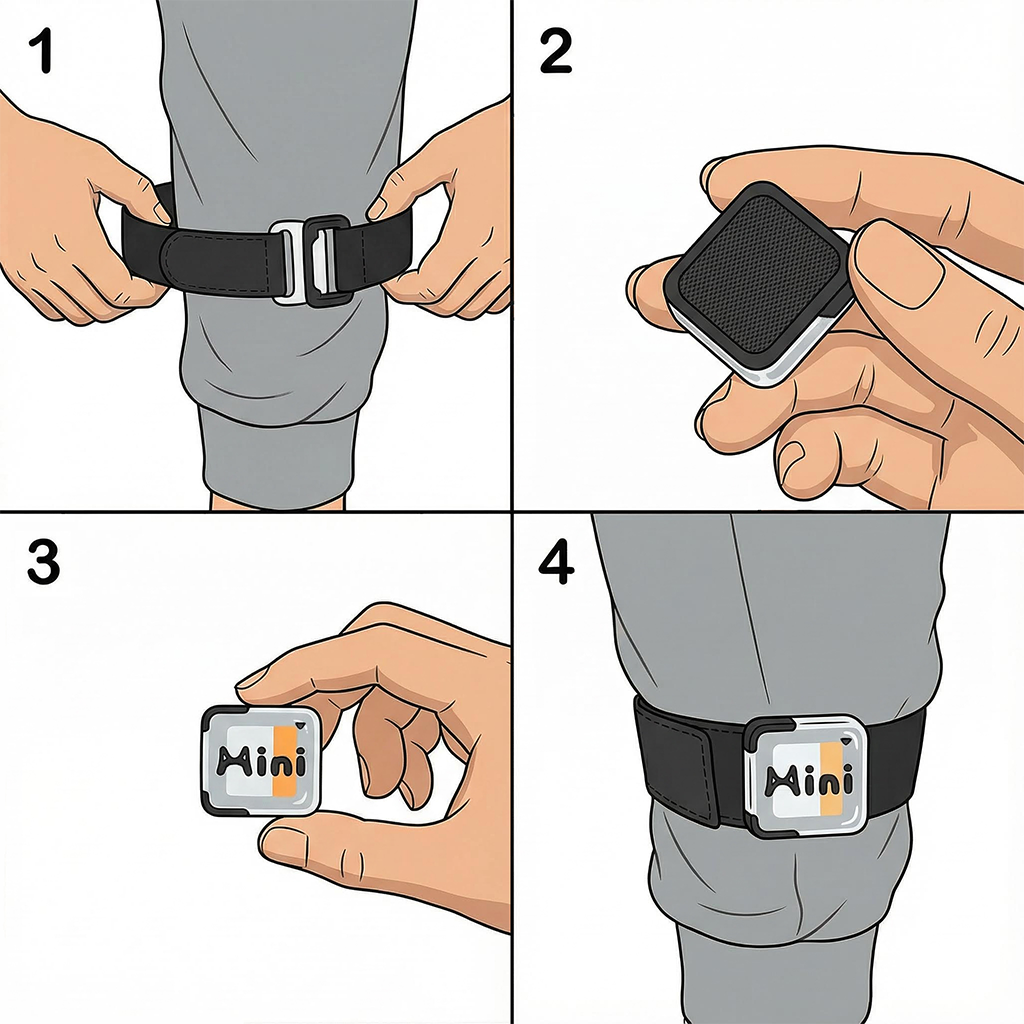
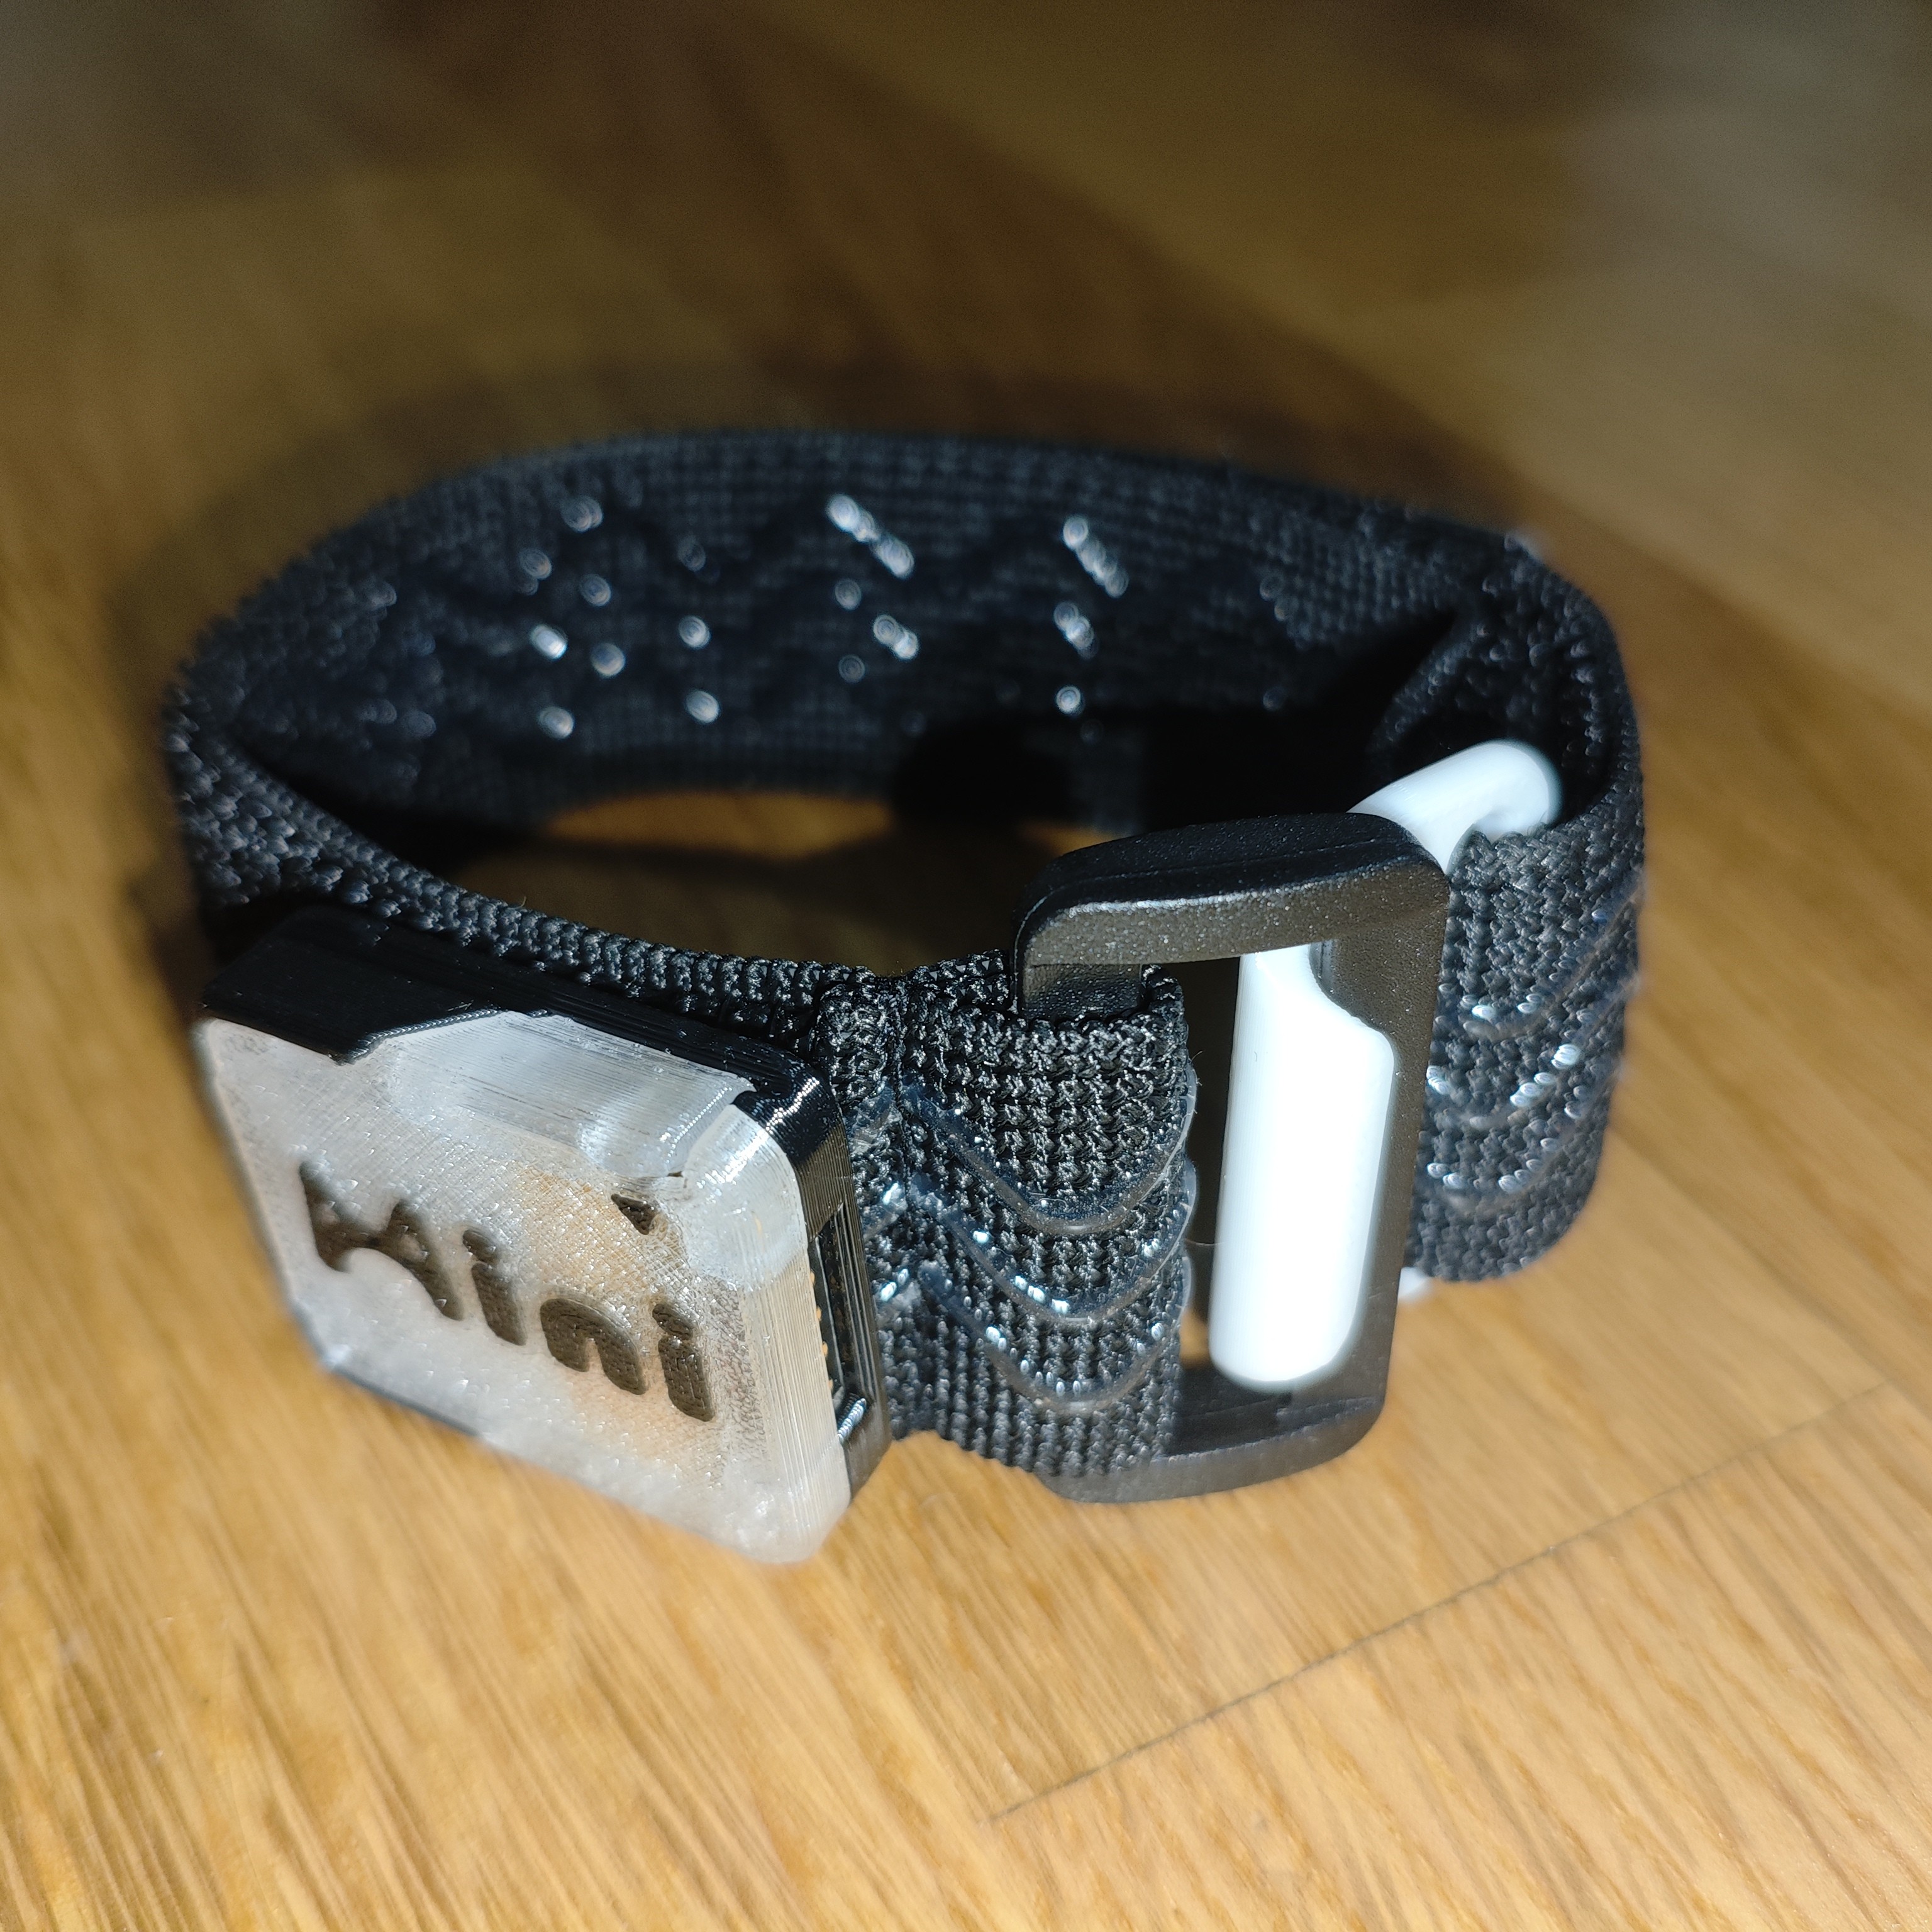
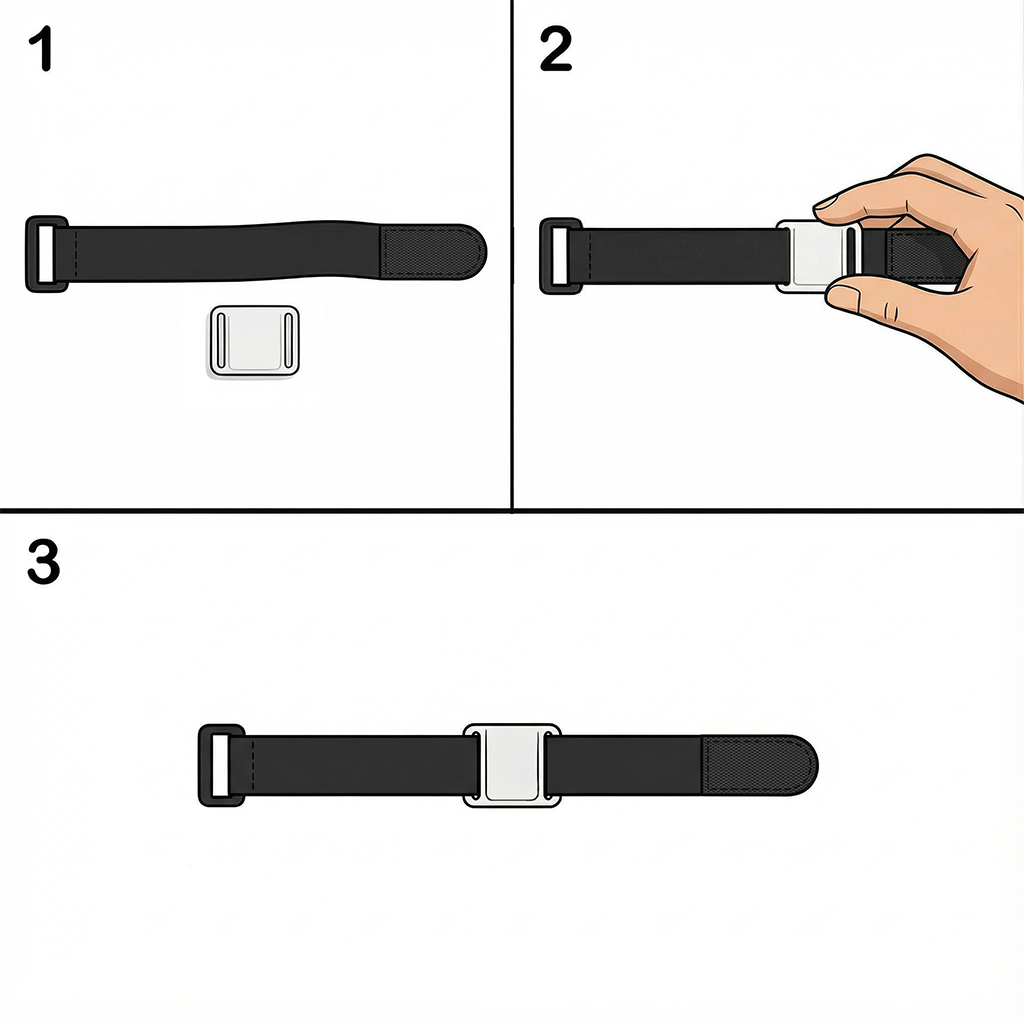
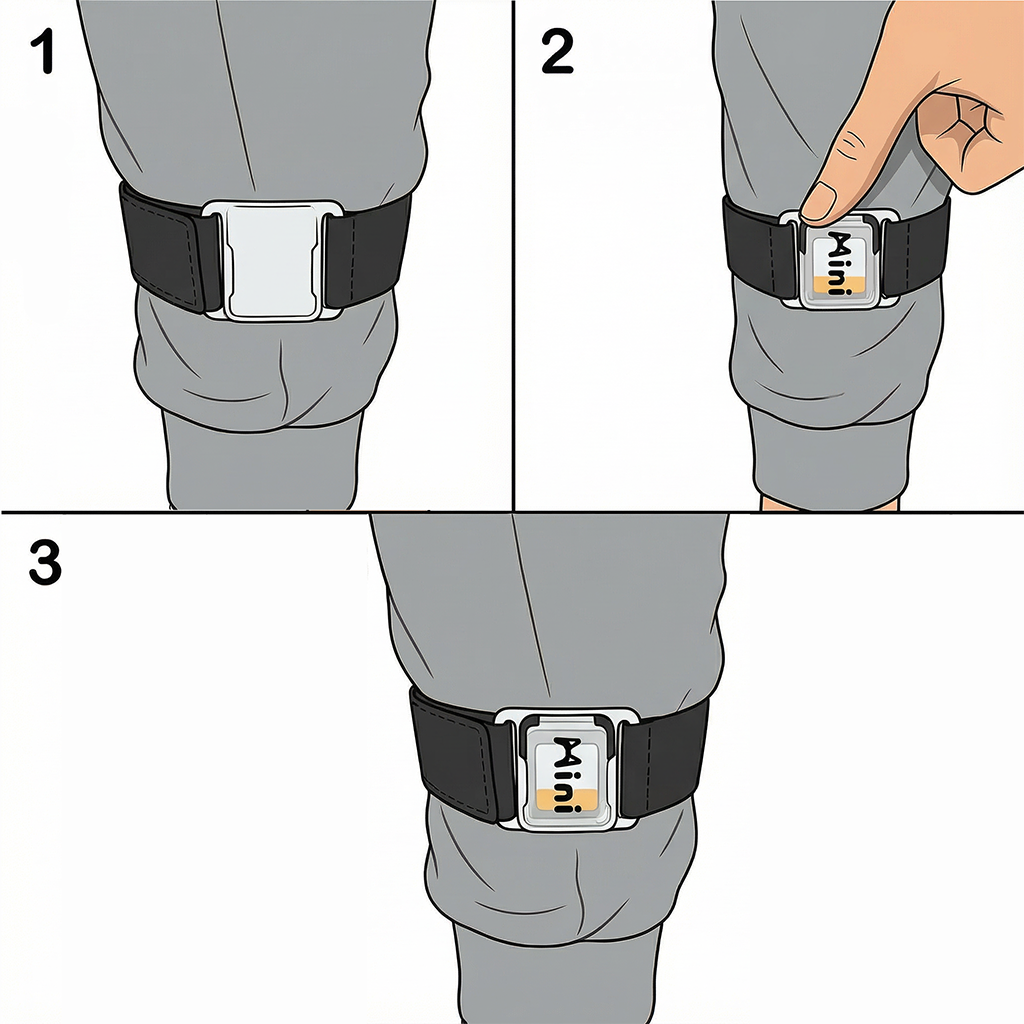
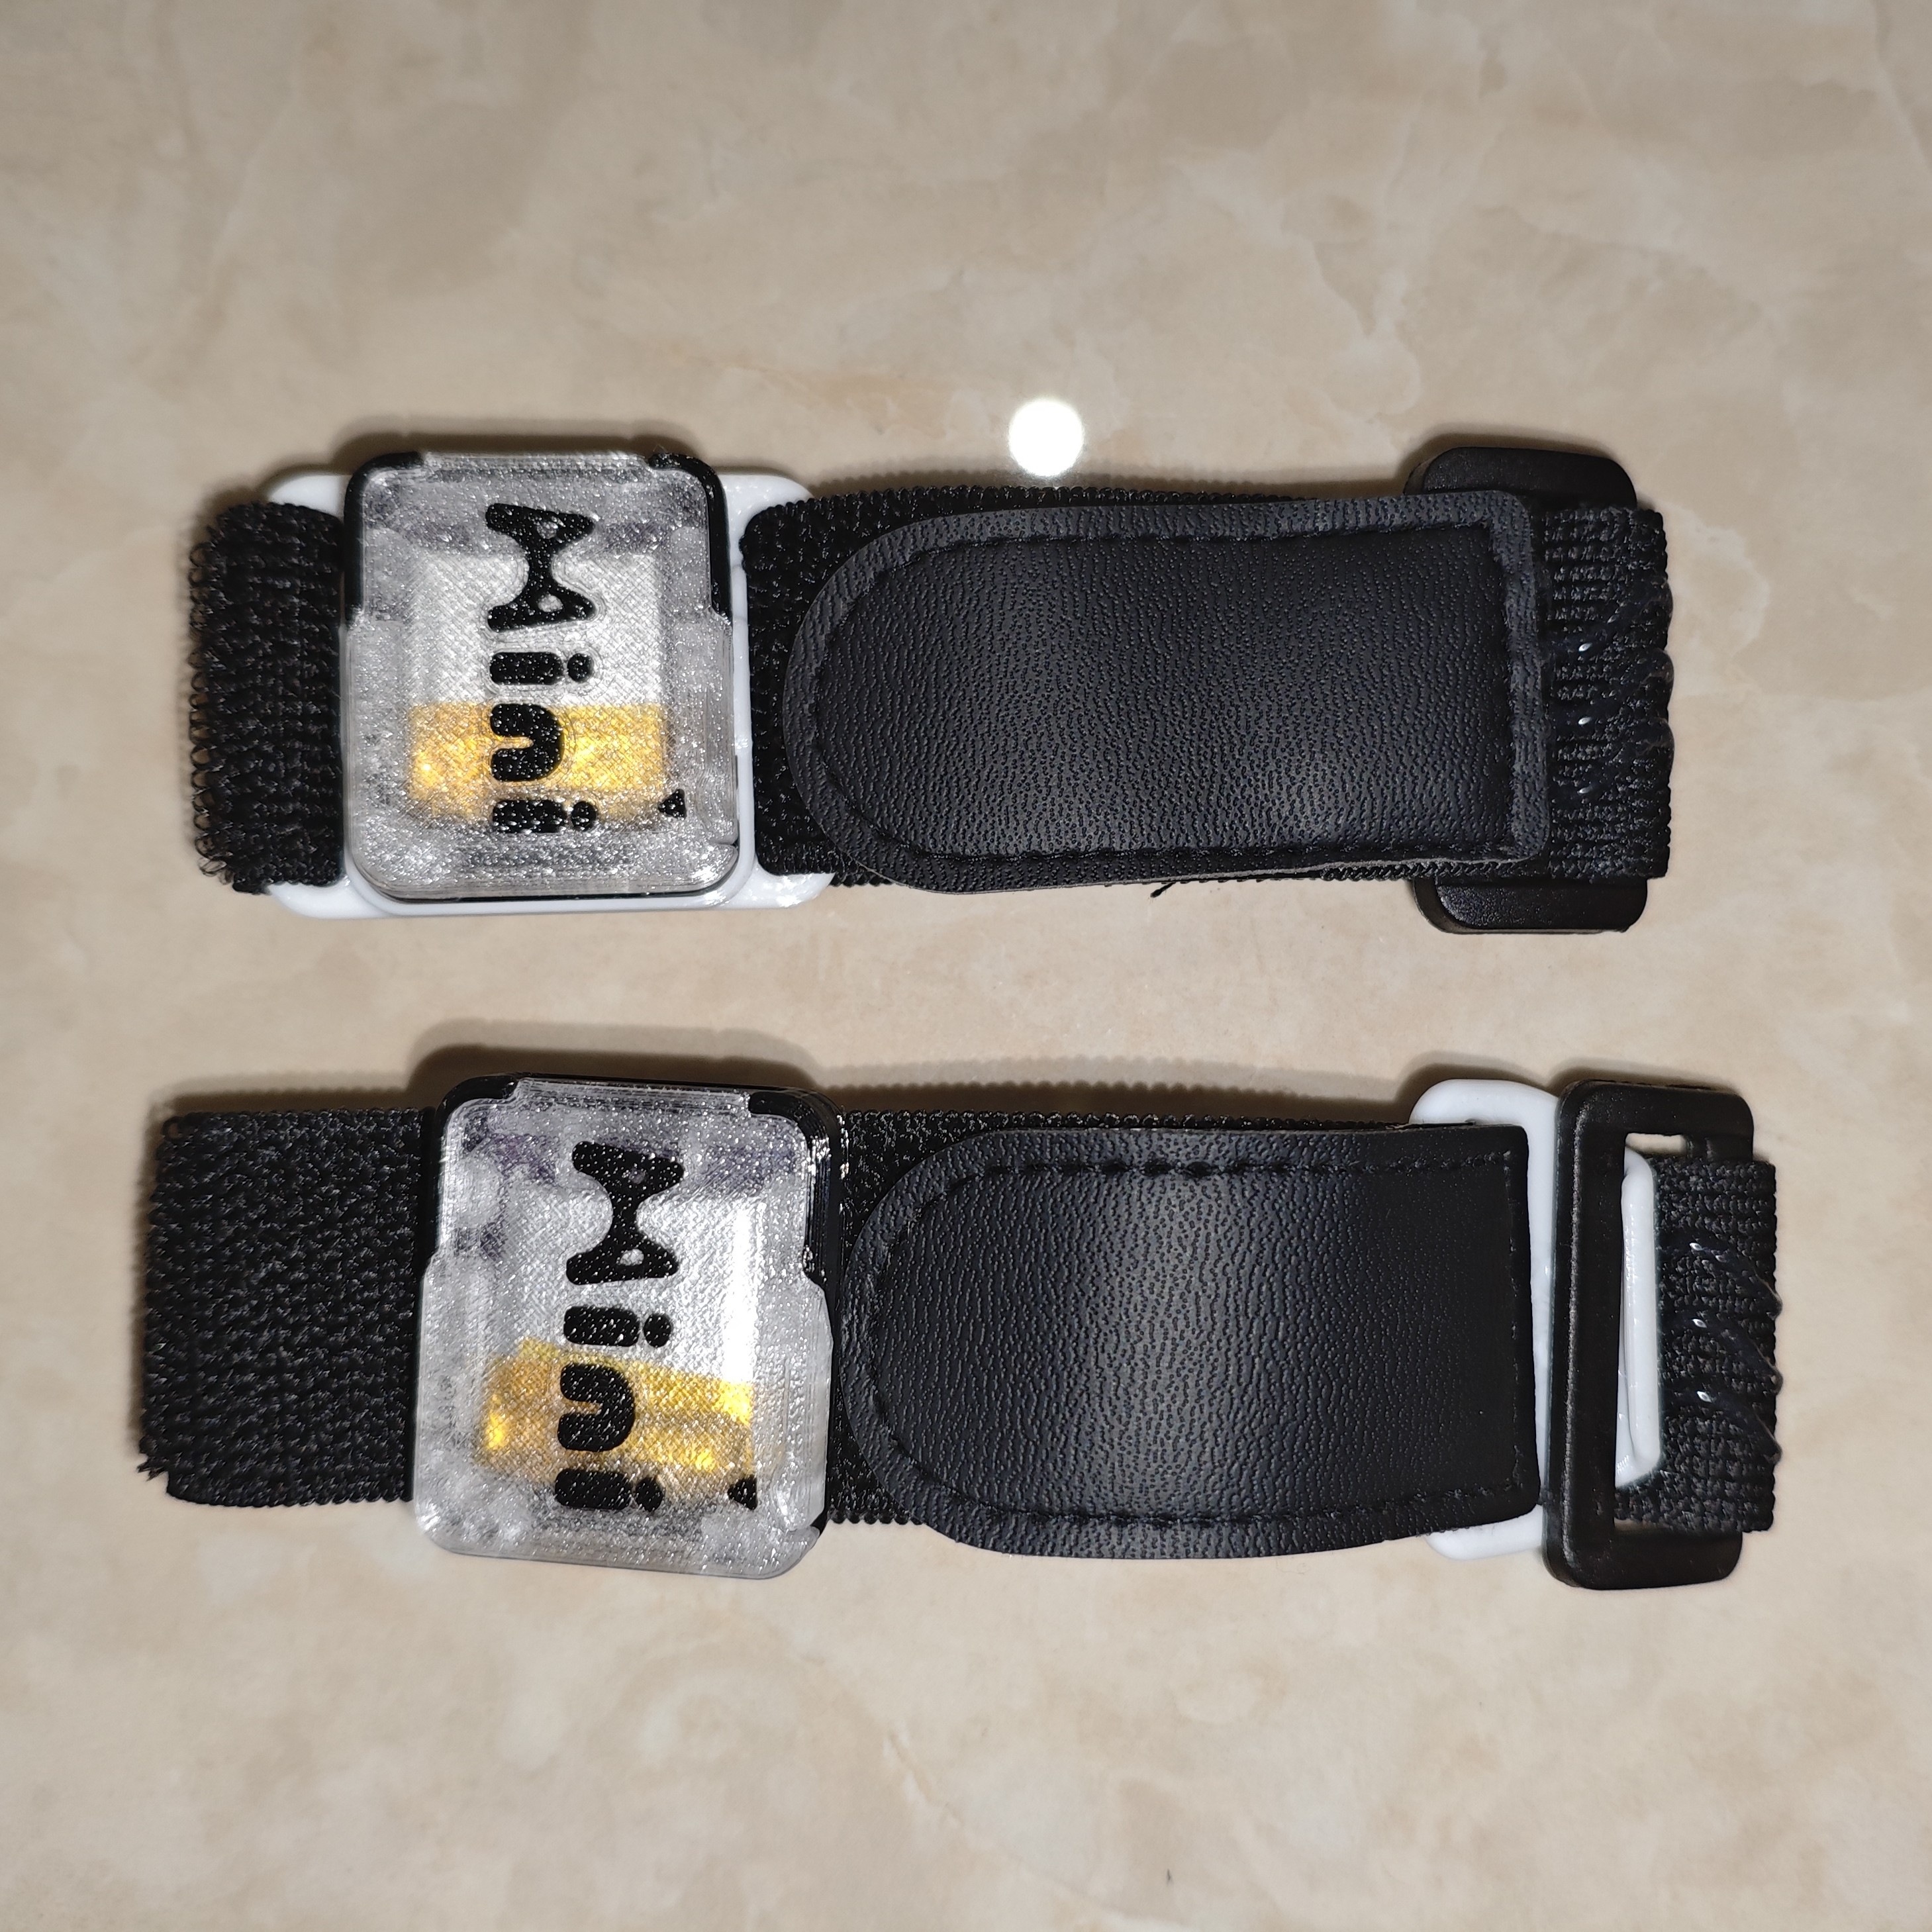
¶ Using Hook Accessories
Applicable to: all body parts
- Thread hook accessory through strap, adjust approximate length then paste Velcro.
- Wrap the anti-slip side of strap around the body part to be worn, hang hook inside the strap loop, adjust Velcro length appropriately.
- Rotate strap with both hands to adjust to proper position, paste the hook side of Velcro on tracker back onto the loop side of strap.
¶ Using Base Accessories
Applicable to: all body parts (backup mounting method)
- Thread strap through base, insert tracker into clip; you can also install hook accessory and use together with base.
- Wrap the anti-slip side of strap around body part to be worn, thread Velcro through fixing ring, paste Velcro to wear strap.
- After completion, you can insert tracker into base to fix.
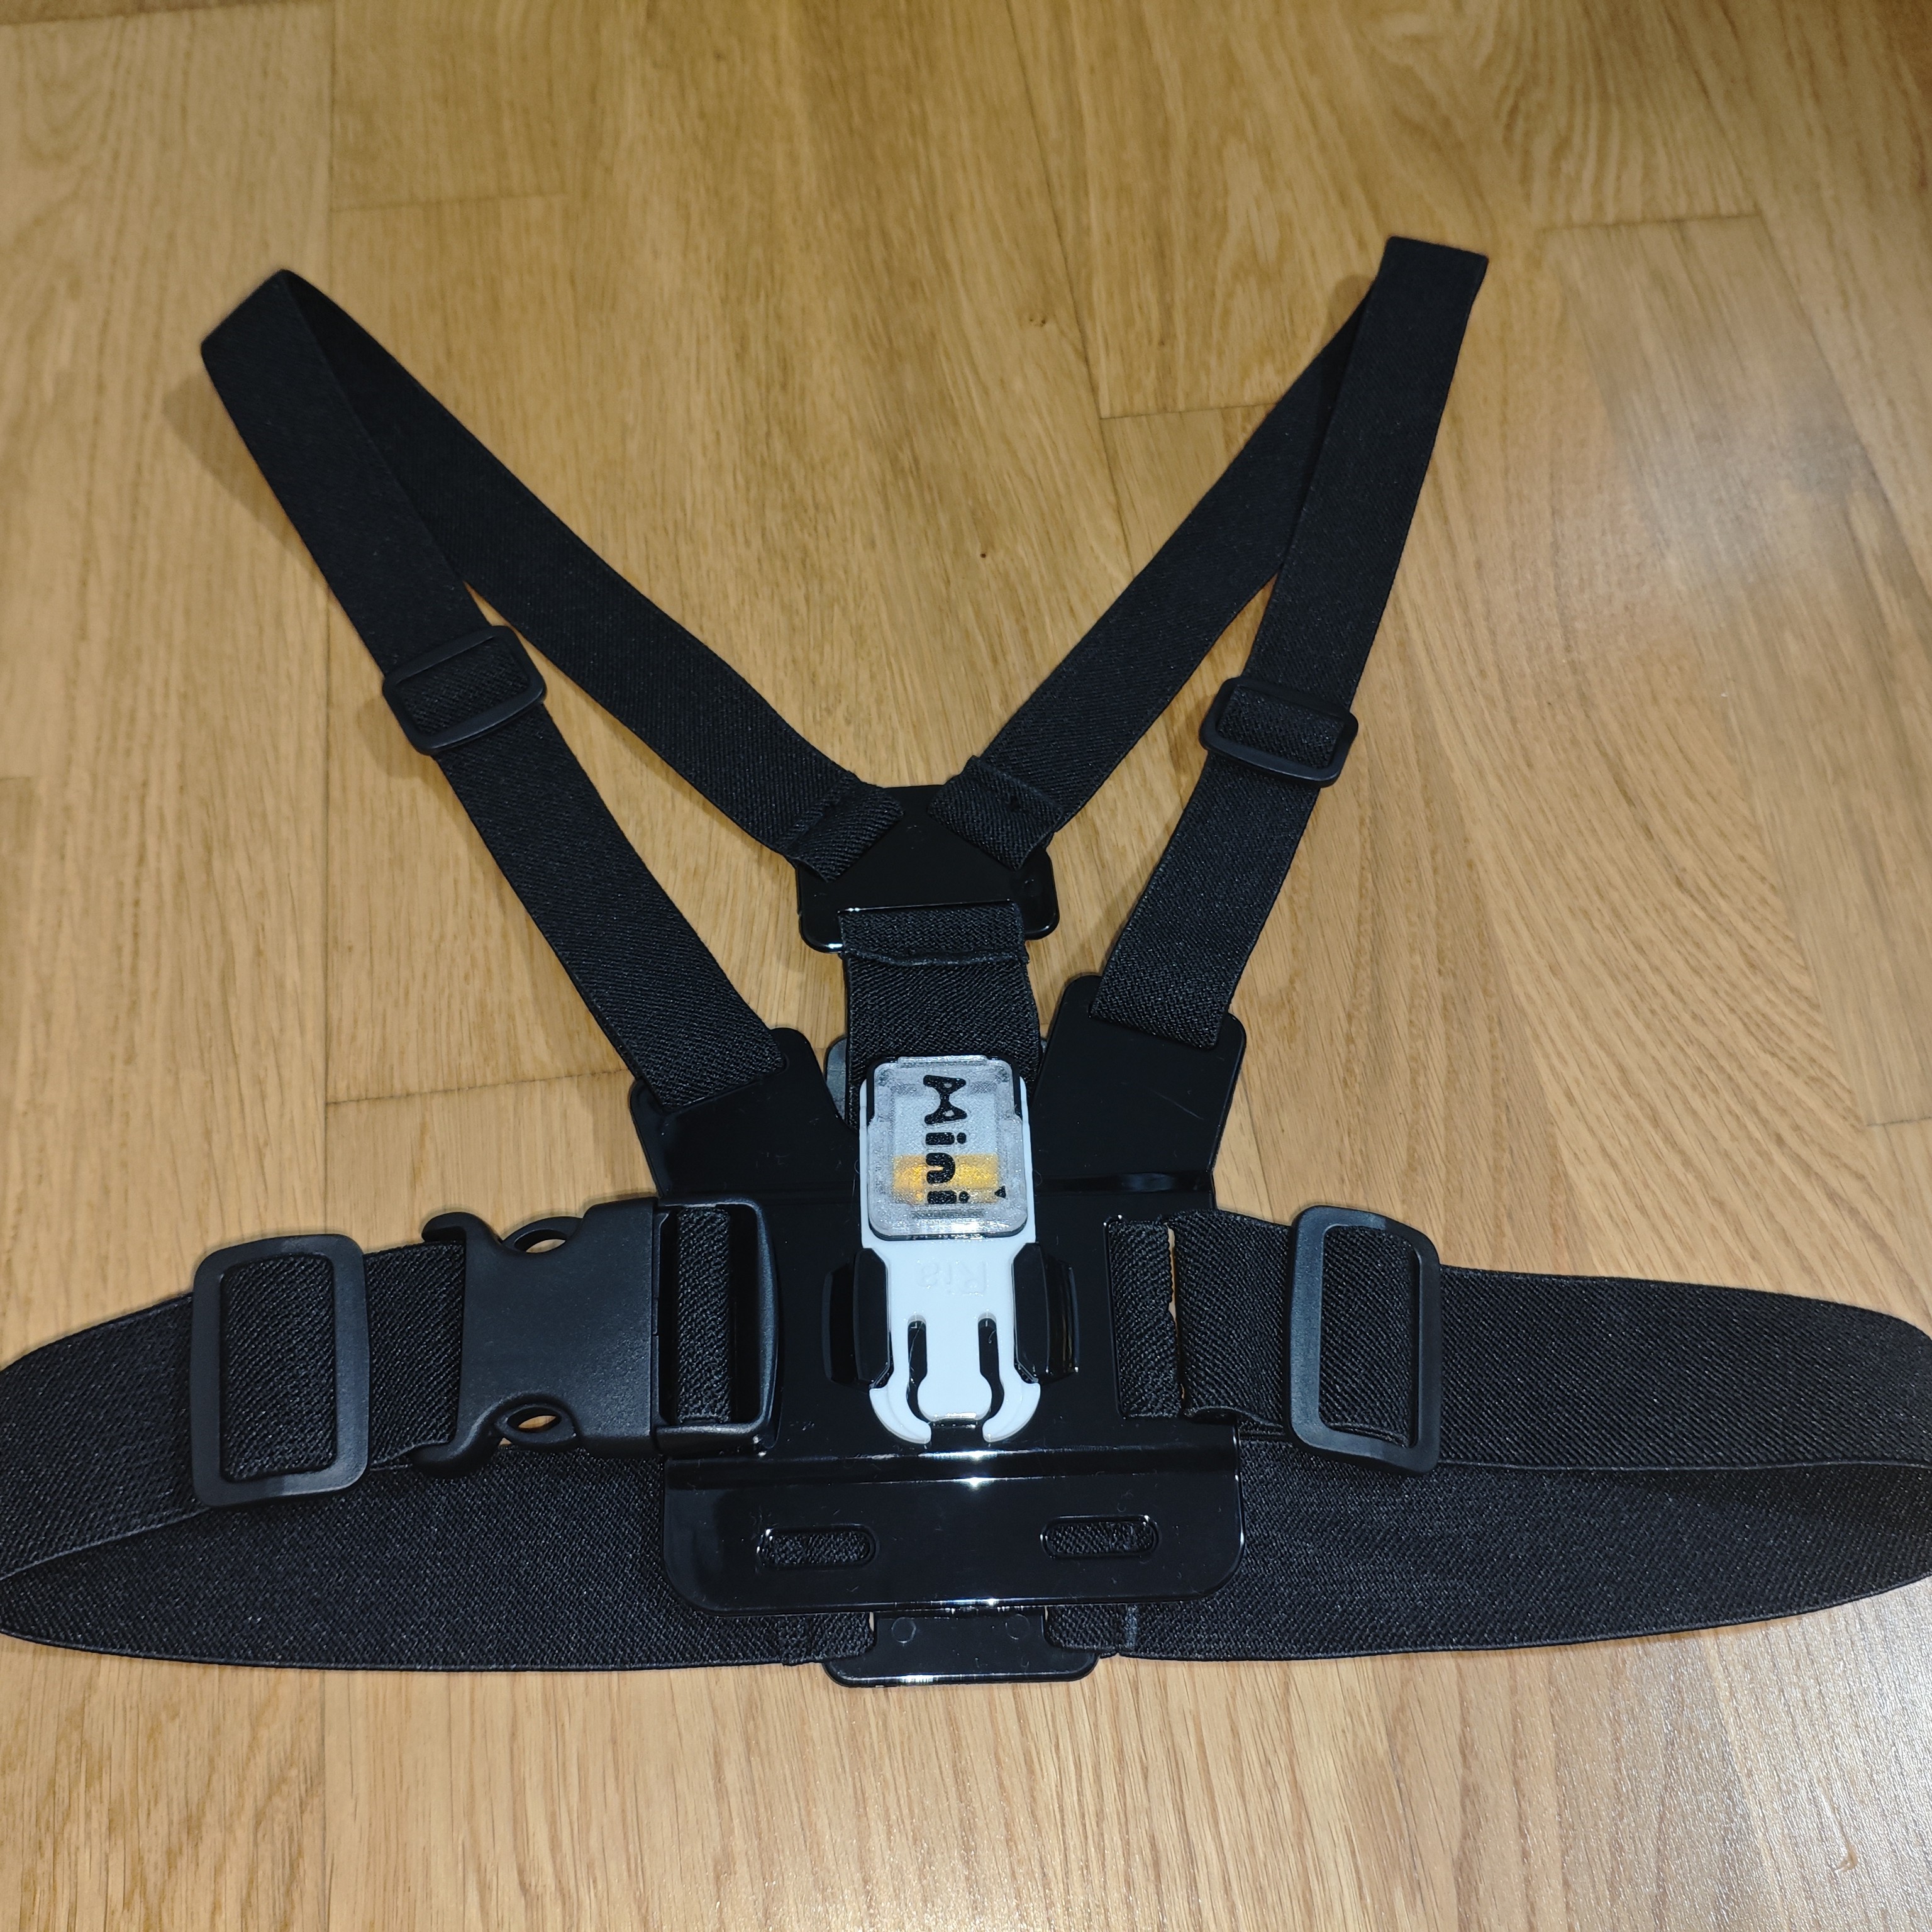
¶ Using Chest Strap Accessories
Applicable to: chest only (backup mounting method)
- Insert "Clips applicable to GoPro chest strap" component into "GoPro Chest Strap", then insert tracker into clip. Regular strap accessories can also be purchased separately and used to secure with straps.
¶ Community
You can join the Community of each product to share experiences with other users.
¶ Using Software
Errors are more likely to occur on first installation or use of software. If errors or other abnormal situations occur, please refer to this troubleshooting guide.
Before starting software installation, you must close:
SteamVR, and all VR games and all streaming software, to avoid partial component installation failures.
¶ Installing Software
Below are the SlimeVR installation methods, choose one method to install.
- Install from Steam (recommended)
The simplest SlimeVR installation method, or you can search
SlimeVRin Steam Store.
- Web Installer automatic installation program (not recommended)
You can use Web Installer to automatically install the latest SlimeVR app and OpenVR driver.
If during automatic installation, installation takes too long, installation fails, or applications cannot be downloaded normally, please use manual installation.
- Click me to download Online Installer: Web Installer
- Keep installation options as default, generally no special modifications needed.
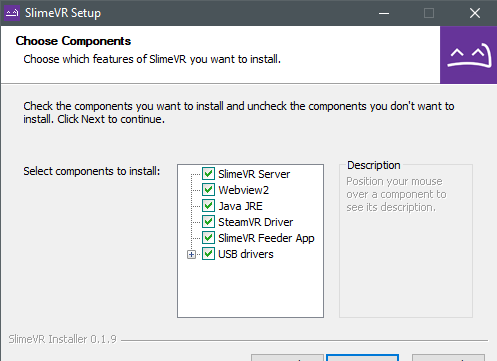
- Manual installation (not recommended)
If the above installation methods are not available, please follow the guide below for manual installation.
¶ Software Configuration
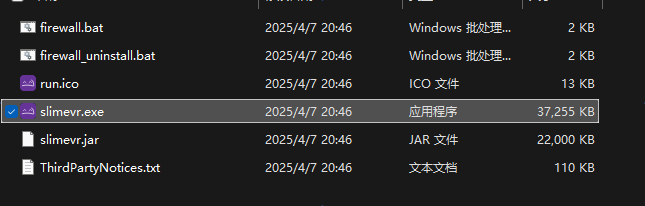
¶ Launching Software
- You can launch the program via "Desktop Shortcut" or running
slimevr.exe.

¶ Initial Configuration
If you encounter problems during use, please read: Troubleshooting Guide.
If you installed through Reading Manual Installation Guide, please make sure you have not missed any installation steps before this.
When streaming with VR device, headset height must be set to real ground height. Please do not use VR device seated mode (if no such setting, no adjustment needed).
If SlimeVR software prompts firmware update, please ignore. For our products, using firmware not provided by Styria may cause tracker faults or damage. Our firmware updates should follow this: Firmware Update Guide.
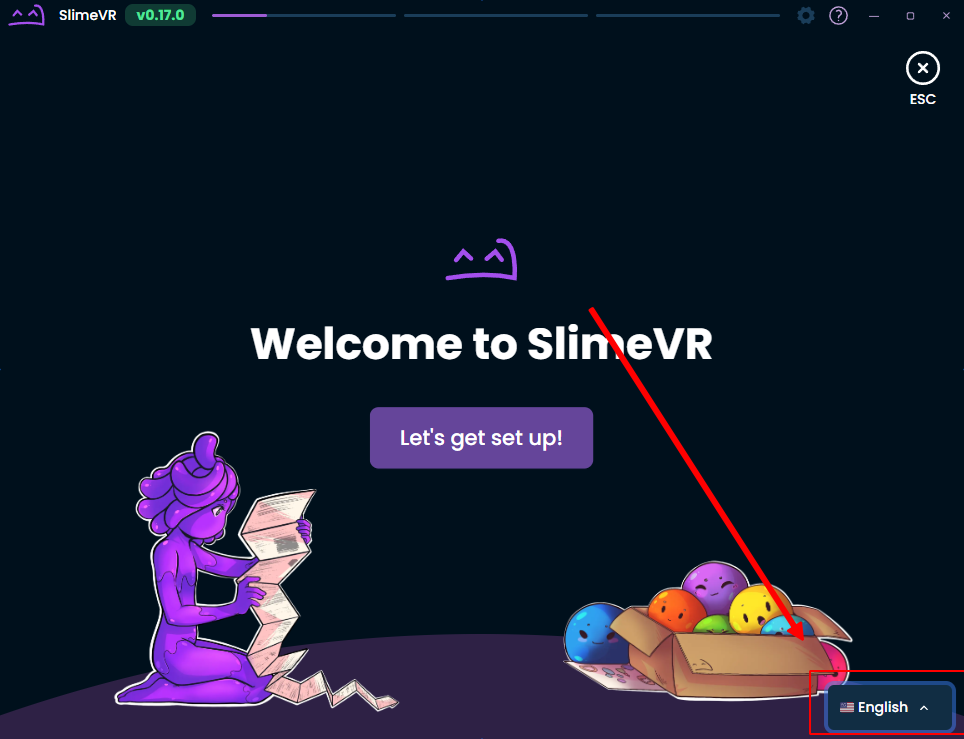
-
After launching, you can adjust language in the lower right corner of the software and complete device configuration following the wizard.
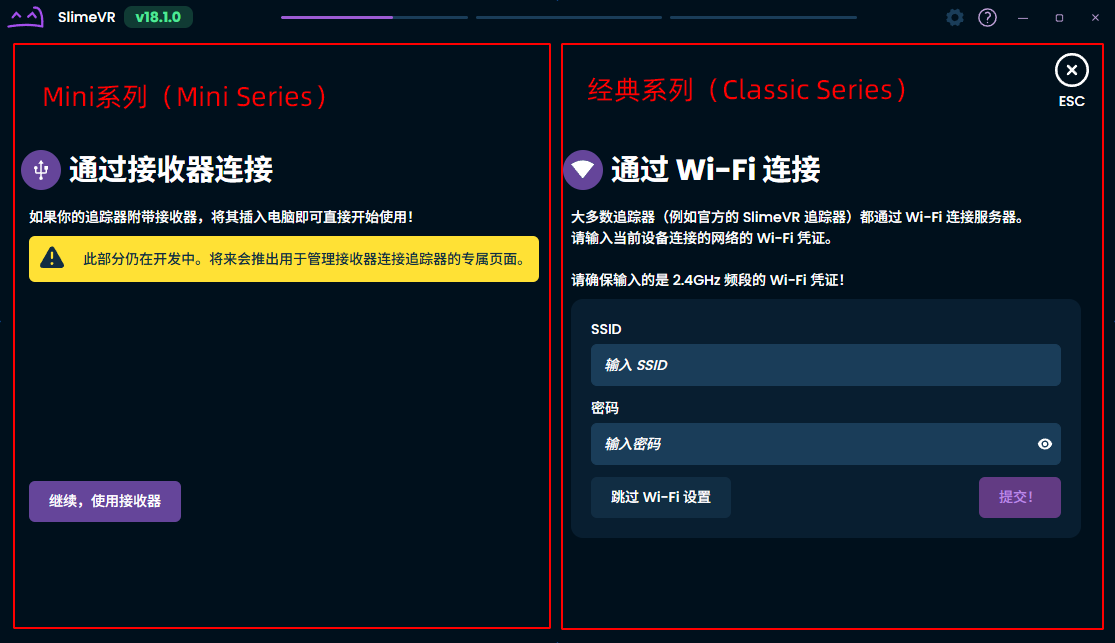
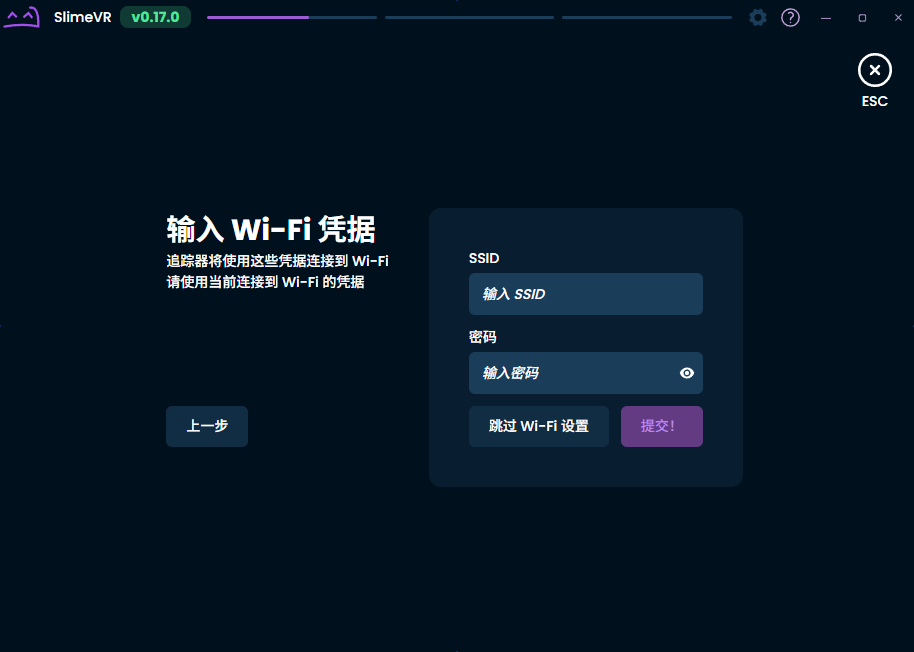
-
You are using
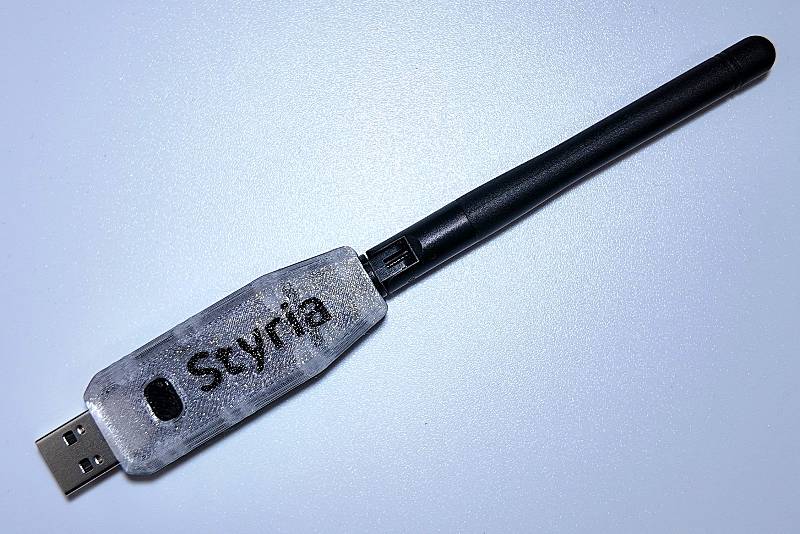
MINI Seriesdevices, this series does not need WiFi network configuration. Please insert the receiver into your computer, start the trackers, and skip the WiFi connection step.
-
Now assign trackers, select the number of trackers to assign on the left, and assign to each body part:
- You do not need to assign
trackerstohead,left hand, orright hand. - If you are using 8-point trackers and need to assign to arms instead of feet, select 10 points for assignment and keep left foot and right foot as
Unassigned.
- You do not need to assign
-
Click the body part to assign, and select unassigned trackers with mouse. Or, double-click a tracker to select it.
-
After successful assignment, you will exit the tracker selection page,
Unassignedtext will change tocorresponding tracker name. After all assignments are complete, click Continue.

-
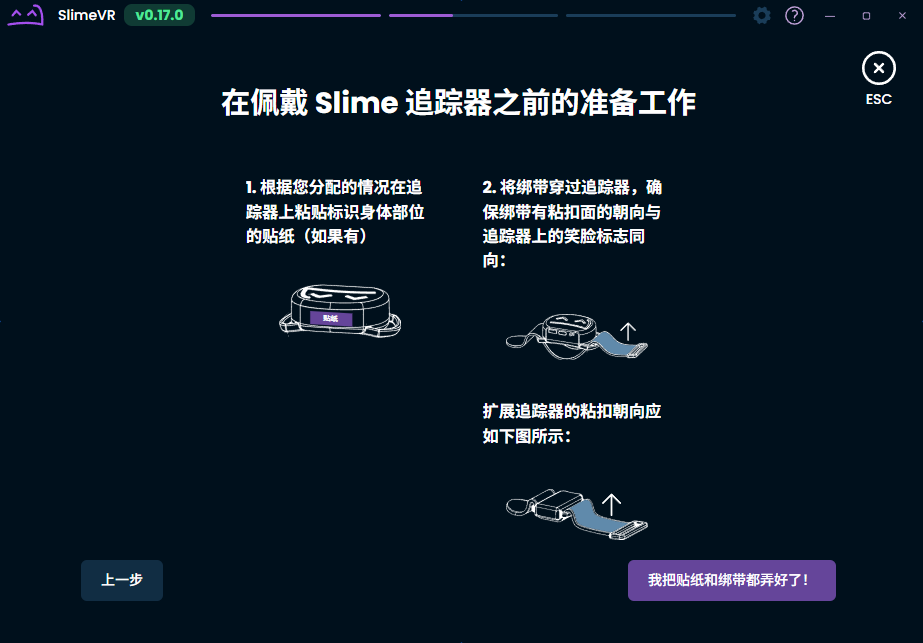
Product packaging includes stickers, you can use stickers to mark body parts for trackers correct sticker paste diagram as follows:
-
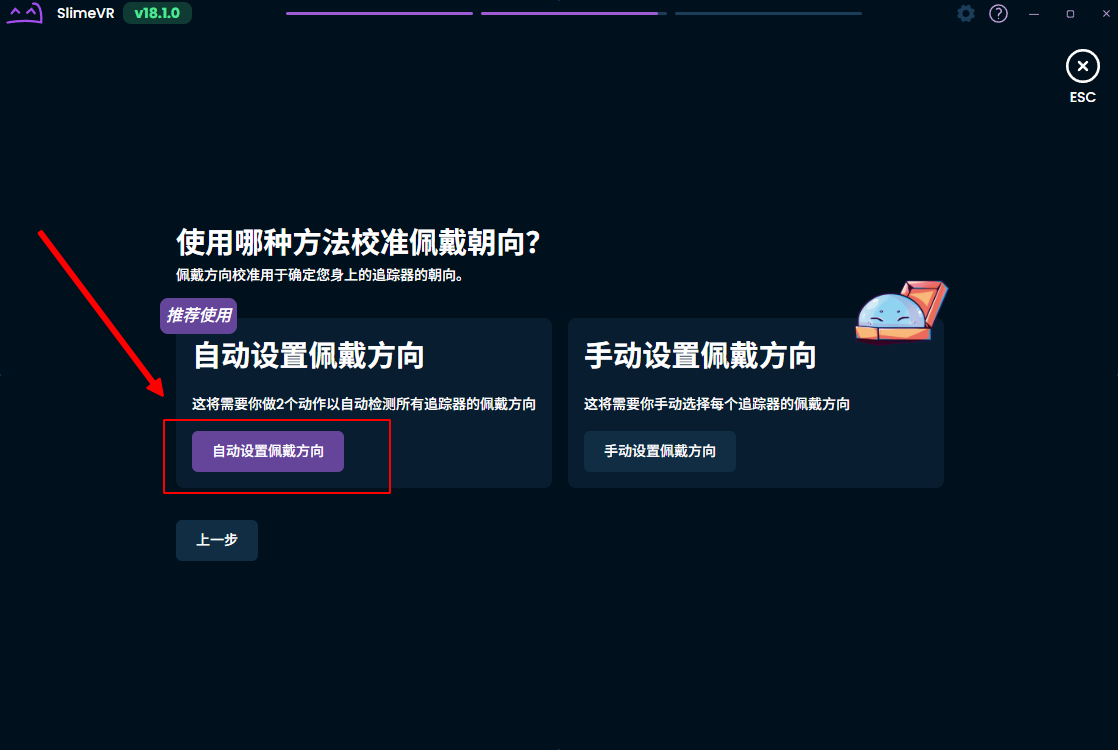
Now you can put on your headset and controllers, enter SteamVR for next step configuration, continue following the wizard to complete subsequent operations (mount calibration and body proportion settings):
-
Now you have completed the initial basic configuration wizard.
-
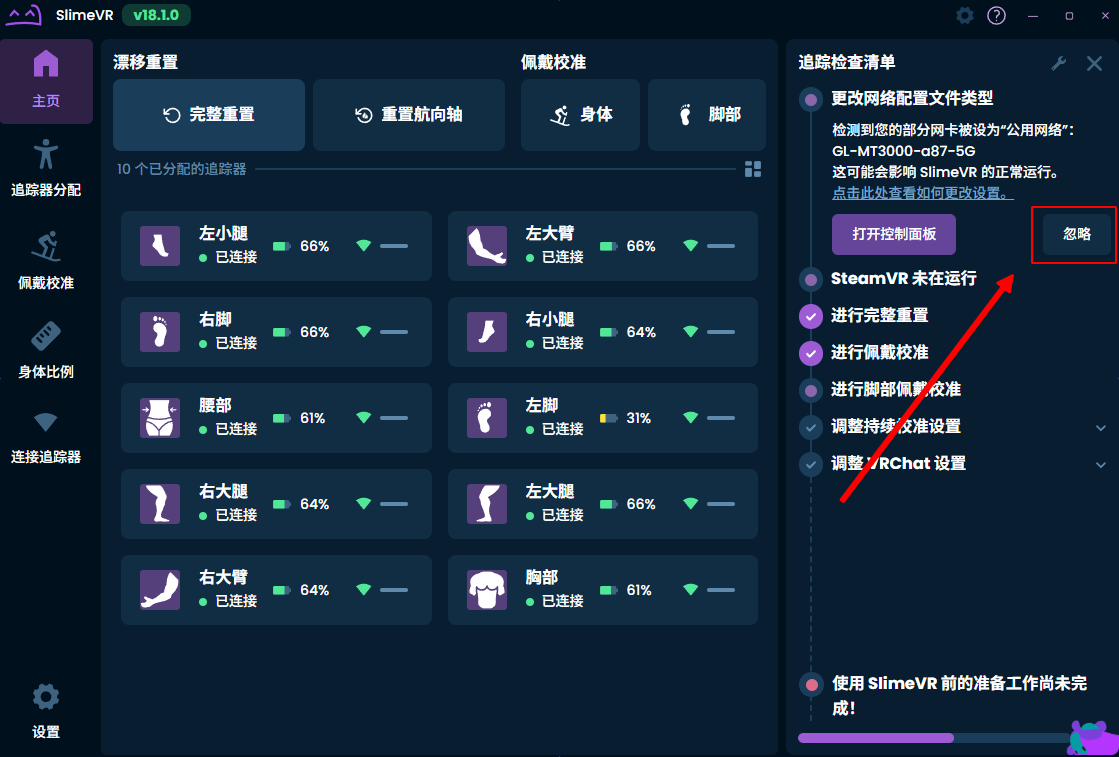
You are using
MINI Seriesdevices, no need to connect SlimeVR application via LAN. If this warning appears, you can directly ignore it:
¶ Feature Explanation
¶ When to Use Reset
- Every time after
re-wearing trackers/headsetdevice orre-opening application, you should performDrift Reset - Full ResetandMount Calibration - Body (Reset Mount)before starting to use the application. - For long-term tracker use with natural drift in software, you can use
Drift Reset - Full ResetorDrift Reset - Reset Yaw Axisas needed. - For long-term tracker wear causing displacement between tracker and body (manifests as:
Drift Reset - Full Resetdoes not fix direction issues), you should performDrift Reset - Full ResetandMount Calibration - Body (Reset Mount). - If you used
8+trackers and assigned trackers to thefoot, after each execution ofMount Calibration - Body (Reset Mount), you also need to executeMount Calibration - Foot (Reset Foot Mount)to calibrate thefootwearing direction.
¶ Drift Reset - Full Reset
- Usage:
Full Resetfunction is used to restore tracker to initial position and direction. - Example: correct wearing position each time use, natural drift of tracker after period of use.
- Operation:
- After clicking button, quickly stand upright.
- Maintain "standing upright" pose for
3 seconds.
- After clicking button, quickly stand upright.
¶ Drift Reset - Reset Yaw Axis
- Usage:
Reset Yaw Axisfunction is used to reset tracker yaw axis direction, without resetting roll and pitch axes. - Example: correct natural drift of key positions when sitting or unable to stand (compared to
Full Reset, this function only takes effect on trunk area). - Operation:
- Need to look straight ahead, try to extend limbs as much as possible, then click
Reset Yaw Axisbutton (standing pose not required).
- Need to look straight ahead, try to extend limbs as much as possible, then click
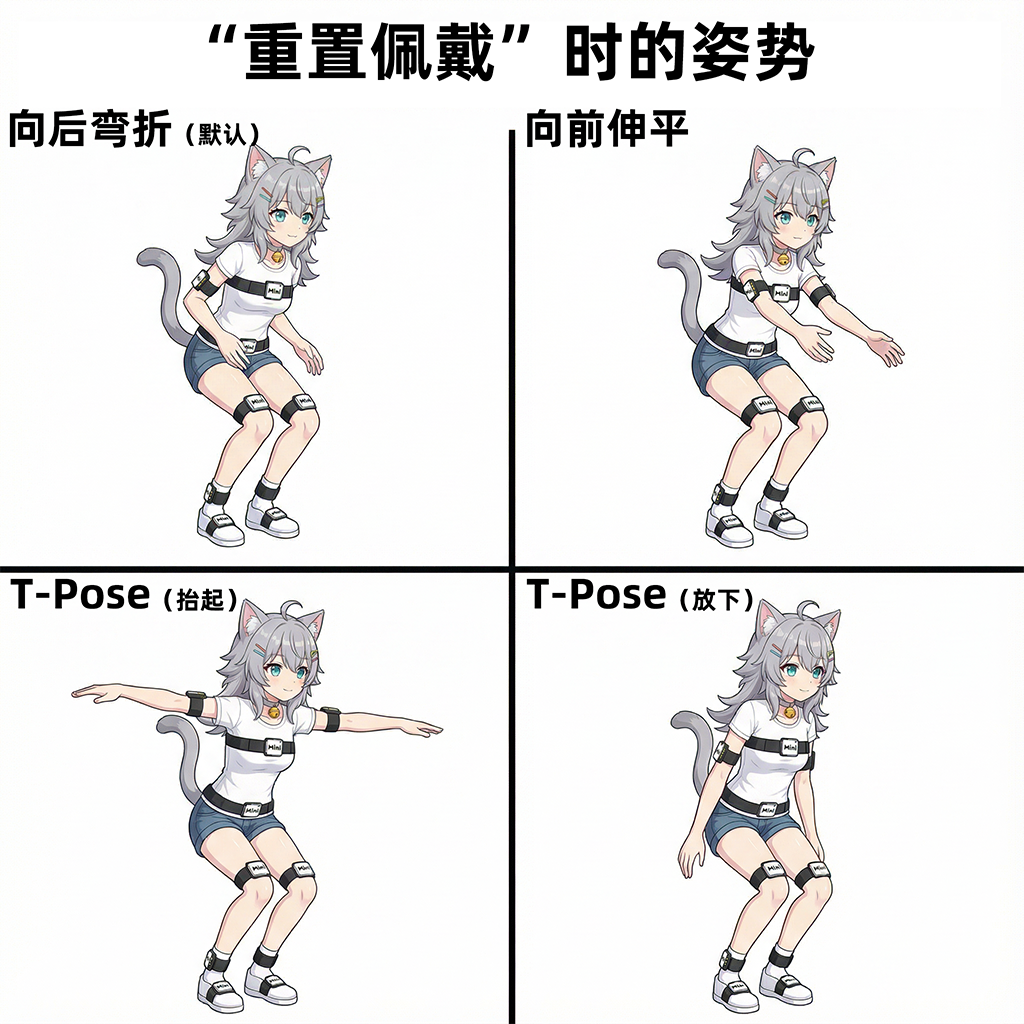
¶ Mount Calibration - Body (Reset Mount)
Incorrect
Mount Calibrationposes will seriously affect tracker performance. Please ensure pose is accurate when executing.
- Usage:
Reset Mountfunction is used to set the forward direction of tracker. By resetting mount, posture deviation caused by wearing displacement can be eliminated. - Example: correct wearing offset each time use, non-front tracker wearing offset, tracking displacement caused by movement.
- Operation:
- Need to perform
Drift Reset - Full Resetfirst, proceed with subsequent steps as soon as possible after completion. - Click
Reset Mountbutton, quickly switch to corresponding pose (default is top-left pose, there are 4 poses total, refer to your settings).
- Maintain corresponding pose for
3 seconds.
- Need to perform
- Common Errors:
Mount Calibrationpose incorrect, when assuming pose: legspigeon-toedorduck-footed:- Abnormal kicking direction, etc.
Mount Calibrationwaistandchestmovement not sufficient, bending amount not enough:- Kicking may be normal, but after sitting, waist will tilt sideways.
- Kicking and sitting are normal, but when leaning back, model deforms, etc.
Pose diagram below uses
10-pointsetup: becauseforearmhas no tracker, there is noforearmdirection feedback, soforearmin skeleton preview does not extend forward. For reference only forwaistandchestmovement amount. Actual calibration should follow theMount Calibrationdiagram above.
| Insufficient movement | Sufficient movement |
|---|---|
 |
 |
Cannot correctly identify waist and chest wearing direction |
Can correctly identify waist and chest wearing direction |
¶ Mount Calibration - Foot (Reset Foot Mount)
- Usage:
Reset Foot Mountfunction is used to set forward direction of foot tracker. By resetting foot mount, posture deviation caused by foot wearing displacement can be eliminated. - Example: correct wearing offset each time use, non-front tracker wearing offset, tracking displacement caused by movement.
- Operation:
- Need to perform
Drift Reset - Full Resetfirst, proceed with subsequent steps as soon as possible after completion, or execute quickly afterMount Calibration - Bodyis done. - Click
Mount Calibration - Footbutton, keep feet intiptoe posefor3 seconds.
- Need to perform
¶ More Features
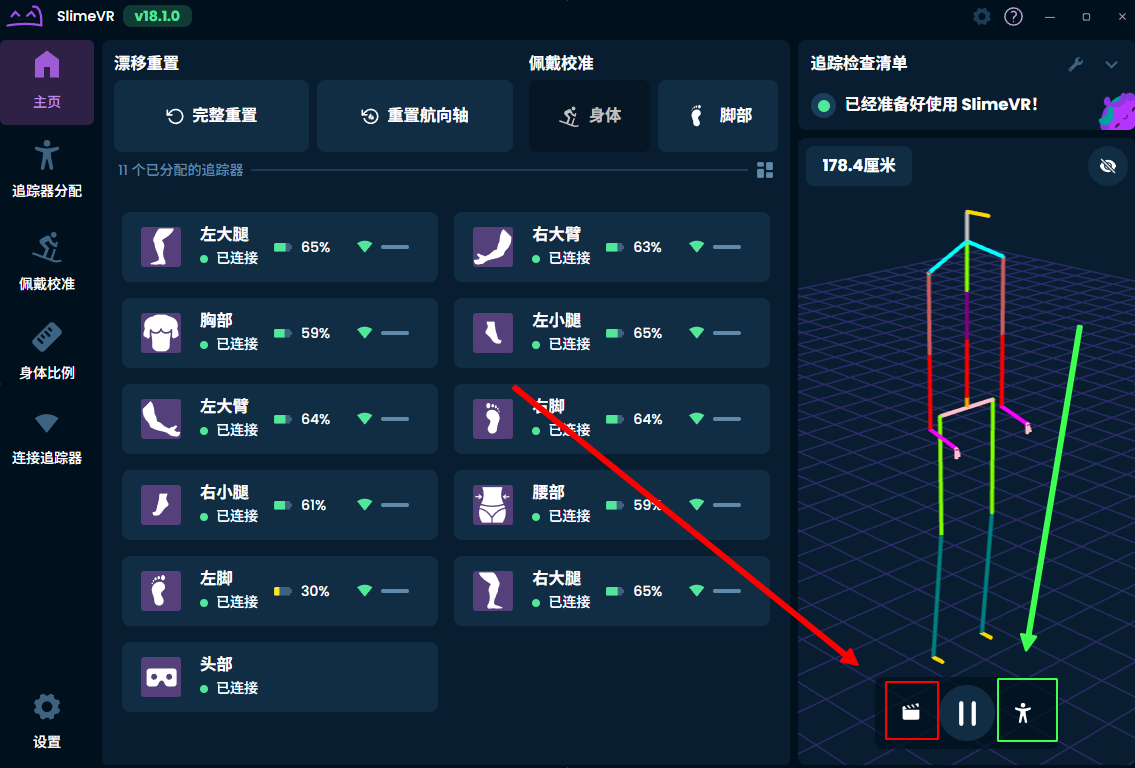
- After all preparation phases are complete, you can also use the following features:
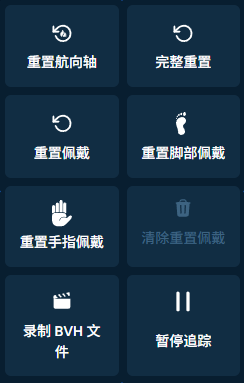
- The red arrow points to
Record BVH File, which can export.bvhformat motion capture data files (100Hz). This may be useful for developers who need to create animations and games.- First click: select file save name and location, then start recording.
- Click again: stop recording.
- Green arrow points to
Motion Capture Mode, this mode was developed for tracking motion without headset (but no position data). Currently seems unfinished, stay tuned.
- The red arrow points to
¶ Experience Optimization
¶ Calibrate Device and Software
Calibration must be performed on first use.
If you feel device drifts too fast (e.g., less than 10 minutes), you can also try calibrating the device.
¶ Drift Not Solved After Calibration
- If after calibrating the device, it still drifts too fast, then you need to check if the tracker is worn properly?
- For trackers on the
chestandwaist, it is generally more recommended to wear them as close to your body as possible, near the innermost clothing, especially in winter. Avoid wearing them on very thick, fluffy clothes or pants outside.
- For trackers on the
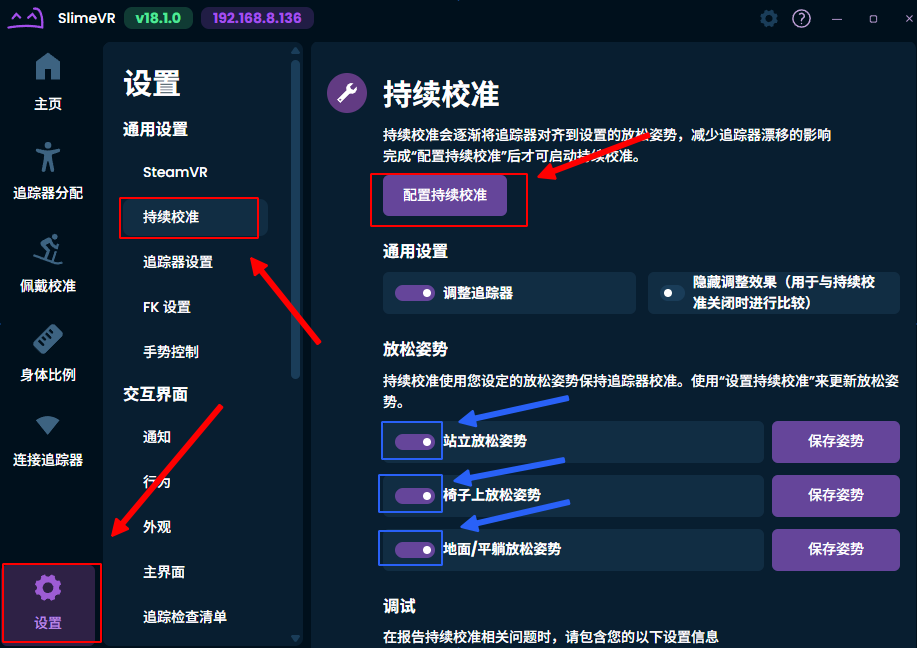
- Check whether the last
Continuous Calibrationwas configured with the correct pose?- When the button to save pose for
Continuous Calibrationis clicked, it will immediately save current pose as calibration reference: you must assume the pose first, then use mouse or controller to click the button. - If not, try reconfiguring it in settings, and confirm after assuming the corresponding pose, this is very important.
- If your space is limited and you cannot assume the corresponding pose, skip that pose and do not configure it.
- Or, after configuration is complete, disable unnecessary poses in settings.
- When the button to save pose for
¶ Quick Gestures
If this feature is frequently mistakenly triggered, you can disable it.
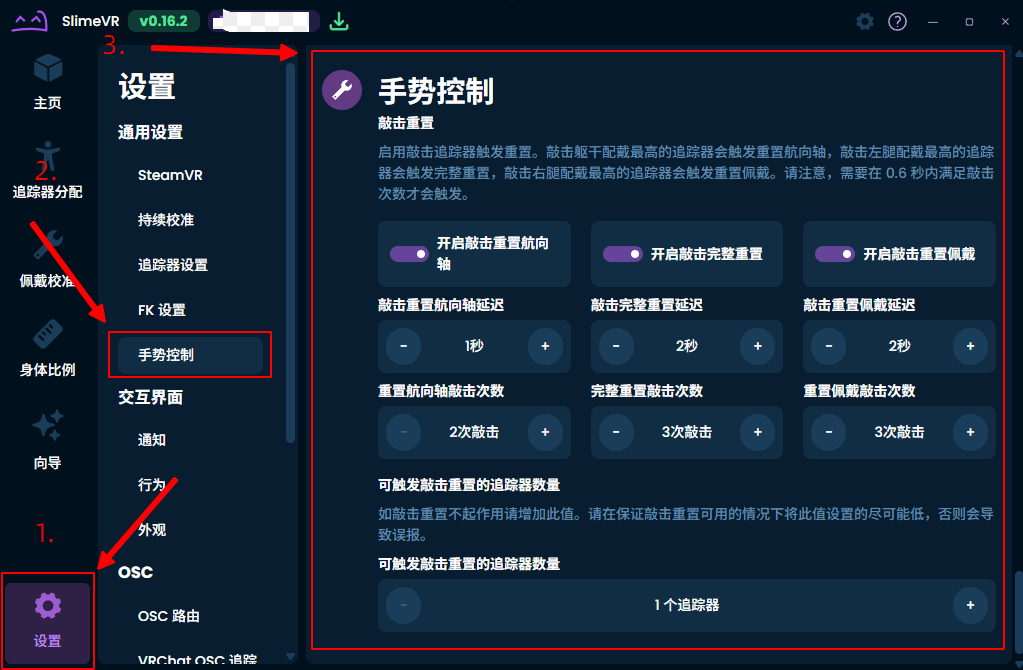
- Description: You can configure
Tap Reset FunctioninSettings,General Settings,Gesture Control, to quickly use various reset functions by tapping the tracker, without clicking buttons in software.
- Tap recognition is not absolutely accurate. You can try different
methods,anglesto lightly tap Slime device, such as usingcontroller,finger,fingernail,knuckle. Try multiple times to find your most suitable tapping rule.
¶ Quick Power Off
This feature is supported after firmware version: v1.9.0_260513.
- When
trackeris powered on and normally connected toreceiver, you can click thereceiverbutton to turn off alltrackersin a few seconds.
¶ Skeleton Adjustment
- Description: By default, automatic body proportions are not absolutely accurate, but still meet basic use. You can further optimize body proportion parameters for more accurate tracking performance.
¶ Long-term Storage
- If your device needs to be stored long-term and no longer used, we recommend keeping battery at
60%-80%, then powering off device (sleeping) bylong-pressing function keyto extend battery life. Recommend checking device remaining battery every3 monthsto avoid excessive battery discharge.
¶ Motion Wake
MINI Seriesproducts: firmware after versionv1.4.0(251219) stably supports motion wake function. If not using for a short period (e.g., less than one week), you can placetrackeronflat and vibration-freegroundortable.- If you place on ground or table that may have vibrations, tracker may wake repeatedly, which may affect battery life. In this case, you should long-press button for
3 secondsto turn off tracker, rather than using this feature. - No special operation needed for powering off, device will automatically go to standby after a period of time, entering low power state. No need to operate to power on after picking up,
trackercan automatically wake with any motion.
¶ Conclusion
You have completed the basic software configuration. If you want to configure Slime for VR applications, please be sure to read: